基础入门-SpringBoot-HelloWorld

系统要求

  • Java 8
  • Maven 3.3+
  • IntelliJ IDEA 2019.1.2

Maven配置文件

新添内容:

1
2
3
4
5
6
7
8
9
10
11
12
13
14
15
16
17
18
19
20
21
22
23
24
25
26
27
28
29
30
<!-- 存放jar包的位置 -->
<localRepository>D:/Program Files/Maven/maven-lib</localRepository>

<!--阿里云的镜像地址-->
<mirrors>
<mirror>
<id>nexus-aliyun</id>
<mirrorOf>central</mirrorOf>
<name>Nexus aliyun</name>
<url>http://maven.aliyun.com/nexus/content/groups/public</url>
</mirror>
</mirrors>

<!--指定JDK版本-->
<profiles>
<profile>
<id>jdk-1.8</id>

<activation>
<activeByDefault>true</activeByDefault>
<jdk>1.8</jdk>
</activation>

<properties>
<maven.compiler.source>1.8</maven.compiler.source>
<maven.compiler.target>1.8</maven.compiler.target>
<maven.compiler.compilerVersion>1.8</maven.compiler.compilerVersion>
</properties>
</profile>
</profiles>

HelloWorld项目

需求:浏览发送/hello请求,响应 “Hello,Spring Boot 2”

创建maven工程

引入依赖

1
2
3
4
5
6
7
8
9
10
11
12
<parent>
<groupId>org.springframework.boot</groupId>
<artifactId>spring-boot-starter-parent</artifactId>
<version>2.3.4.RELEASE</version>
</parent>

<dependencies>
<dependency>
<groupId>org.springframework.boot</groupId>
<artifactId>spring-boot-starter-web</artifactId>
</dependency>
</dependencies>

创建主程序

1
2
3
4
5
6
7
8
9
10
import org.springframework.boot.SpringApplication;
import org.springframework.boot.autoconfigure.SpringBootApplication;

@SpringBootApplication
public class MainApplication {

public static void main(String[] args) {
SpringApplication.run(MainApplication.class, args);
}
}

编写业务

1
2
3
4
5
6
7
8
9
10
11
import org.springframework.web.bind.annotation.RequestMapping;
import org.springframework.web.bind.annotation.RestController;

//@RestController相当于这个类加上了@Controller+@ResponseBody,禁止页面跳转
@RestController
public class HelloController {
@RequestMapping("/hello")
public String handle01(){
return "Hello, Spring Boot 2!";
}
}

运行&测试

  • 运行MainApplication
  • 浏览器输入http://localhost:8888/hello,将会输出Hello, Spring Boot 2!

设置配置

maven工程的resource文件夹中创建application.properties文件。

1
2
3
//设置端口号
server:
port: 8080

打包部署

在pom.xml添加

1
2
3
4
5
6
7
8
<build>
<plugins>
<plugin>
<groupId>org.springframework.boot</groupId>
<artifactId>spring-boot-maven-plugin</artifactId>
</plugin>
</plugins>
</build>

在IDEA的Maven插件上点击运行 clean 、package,把helloworld工程项目的打包成jar包,

打包好的jar包被生成在helloworld工程项目的target文件夹内。

用cmd运行java -jar boot-01-helloworld-1.0-SNAPSHOT.jar,既可以运行helloworld工程项目。

将jar包直接在目标服务器执行即可。

运行之后不关闭IDEA在次运行会报端口错误

  • netstat -ano | findstr “端口号” //查看特定的端口号的信息

    taskkill -pid 进程号 -f //根据上面查出的端口号的信息,杀死进程,-或/

  • 或者打开任务管理器–》详细信息–》找到javax的进程–》终止进程

基础入门-SpringBoot-依赖管理特性

  • 父项目做依赖管理

    1
    2
    3
    4
    5
    6
    7
    8
    9
    10
    11
    12
    13
    14
    15
    依赖管理
    <parent>
    <groupId>org.springframework.boot</groupId>
    <artifactId>spring-boot-starter-parent</artifactId>
    <version>2.3.4.RELEASE</version>
    </parent>

    上面项目的父项目如下:
    <parent>
    <groupId>org.springframework.boot</groupId>
    <artifactId>spring-boot-dependencies</artifactId>
    <version>2.3.4.RELEASE</version>
    </parent>

    它几乎声明了所有开发中常用的依赖的版本号,自动版本仲裁机制
    • 无需关注版本号,自动版本仲裁

      1. 引入依赖默认都可以不写版本
      2. 引入非版本仲裁的jar,要写版本号。
    • 可以修改默认版本号

      1. 查看spring-boot-dependencies里面规定当前依赖的版本 用的 key。

      2. 在当前项目里面重写配置,如下面的代码。

        1
        2
        3
        <properties>
        <mysql.version>5.1.43</mysql.version>
        </properties>
  • IDEA快捷键

    • ctrl + shift + alt + U:以图的方式显示项目中依赖之间的关系。
    • alt + ins:相当于Eclipse的 Ctrl + N,创建新类,新包等。

基础入门-SpringBoot-自动配置特性

  • 自动配好Tomcat

    • 引入Tomcat依赖。

    • 配置Tomcat

      1
      2
      3
      4
      5
      6
      <dependency>
      <groupId>org.springframework.boot</groupId>
      <artifactId>spring-boot-starter-tomcat</artifactId>
      <version>2.3.4.RELEASE</version>
      <scope>compile</scope>
      </dependency>
  • 自动配好SpringMVC

    • 引入SpringMVC全套组件

    • 自动配好SpringMVC常用组件(功能)

  • 自动配好Web常见功能,如:字符编码问题

    • SpringBoot帮我们配置好了所有web开发的常见场景

      1
      2
      3
      4
      5
      6
      7
      8
      9
      10
      public static void main(String[] args) {
      //1、返回我们IOC容器
      ConfigurableApplicationContext run = SpringApplication.run(MainApplication.class, args);

      //2、查看容器里面的组件
      String[] names = run.getBeanDefinitionNames();
      for (String name : names) {
      System.out.println(name);
      }
      }
  • 默认的包结构

    • 主程序所在包及其下面的所有子包里面的组件都会被默认扫描进来

    • 无需以前的包扫描配置

    • 想要改变扫描路径

      • @SpringBootApplication(scanBasePackages=“com.lun”)

      • @ComponentScan 指定扫描路径

        1
        2
        3
        4
        5
        @SpringBootApplication
        等同于
        @SpringBootConfiguration
        @EnableAutoConfiguration
        @ComponentScan("com.lun") //指定扫描的包
  • 各种配置拥有默认值

    • 默认配置最终都是映射到某个类上,如:MultipartProperties
    • 配置文件的值最终会绑定每个类上,这个类会在容器中创建对象
  • 按需加载所有自动配置项

    • 非常多的starter
    • 引入了哪些场景这个场景的自动配置才会开启
    • SpringBoot所有的自动配置功能都在 spring-boot-autoconfigure 包里面

基础入门-容器功能

组件(component):

组件也是抽象的概念,可以理解为一些符合某种规范的类组合在一起就构成了组件。他可以提供某些特定的功能。J2EE来说,有什么servlet,jsp, javabean,ejb都是组件。但实际他们都是类,只不过有他们特殊的规定。组件和类的关系:符合某种规范的类的组合构成组件

容器(Container):

容器也叫做组件容器,组件容器是一种比较特殊的组件,它可以包含其他的组件。我们可以把组件放在组件容器中。

组件添加

@Configuration详解

  • 基本使用

    1
    2
    3
    4
    5
    6
    7
    8
    9
    10
    11
    12
    13
    14
    15
    16
    17
    18
    19
    20
    21
    22
    23
    24
    25
    26
    27
    /**
    * 1、配置类里面使用@Bean标注在方法上给容器注册组件,默认也是单实例的
    * 2、配置类本身也是组件
    * 3、proxyBeanMethods:代理bean的方法
    * Full(proxyBeanMethods = true)(保证每个@Bean方法被调用多少次返回的组件都是单实例的)(默认)
    * Lite(proxyBeanMethods = false)(每个@Bean方法被调用多少次返回的组件都是新创建的)
    */
    @Configuration(proxyBeanMethods = false) //告诉SpringBoot这是一个配置类 == 创建了一个配置文件
    public class MyConfig {

    /**
    * Full:外部无论对配置类中的这个组件注册方法调用多少次获取的都是之前注册容器中的单实例对象
    * @return
    */
    @Bean //给容器中添加组件。以方法名作为组件的id。返回类型就是组件类型。返回的值,就是组件在容器中的实例
    public User user01(){
    User zhangsan = new User("zhangsan", 18);
    //user组件依赖了Pet组件
    zhangsan.setPet(tomcatPet());
    return zhangsan;
    }

    @Bean("tom") // 给组件命名
    public Pet tomcatPet(){
    return new Pet("tomcat");
    }
    }

    最佳实战:如果组件后面还有组件需要用(有依赖关系),则使用Lite模式,减少判断。有依赖关系,使用Full

  • @Configuration测试代码如下:

    1
    2
    3
    4
    5
    6
    7
    8
    9
    10
    11
    12
    13
    14
    15
    16
    17
    18
    19
    20
    21
    22
    23
    24
    25
    26
    27
    28
    29
    30
    31
    32
    33
    34
    35
    36
    37
    @SpringBootConfiguration
    @EnableAutoConfiguration
    @ComponentScan("com.atguigu.boot")
    public class MainApplication {

    public static void main(String[] args) {
    //1、返回我们IOC容器
    ConfigurableApplicationContext run = SpringApplication.run(MainApplication.class, args);

    //2、查看容器里面的组件
    String[] names = run.getBeanDefinitionNames();
    for (String name : names) {
    System.out.println(name);
    }

    //3、从容器中获取组件
    Pet tom01 = run.getBean("tom", Pet.class);
    Pet tom02 = run.getBean("tom", Pet.class);
    System.out.println("组件:"+(tom01 == tom02));

    // 配置类本身也是组件
    //4、com.atguigu.boot.config.MyConfig$$EnhancerBySpringCGLIB$$51f1e1ca@1654a892
    MyConfig bean = run.getBean(MyConfig.class);
    System.out.println(bean);

    //如果@Configuration(proxyBeanMethods = true)代理对象调用方法。SpringBoot总会检查这个组件是否在容器中有。
    //保持组件单实例
    User user = bean.user01();
    User user1 = bean.user01();
    System.out.println(user == user1);

    User user01 = run.getBean("user01", User.class);
    Pet tom = run.getBean("tom", Pet.class);

    System.out.println("用户的宠物:"+(user01.getPet() == tom));
    }
    }
  • 最佳实战

    • 配置 类组件之间无依赖关系用Lite模式加速容器启动过程,减少判断
    • 配置 类组件之间有依赖关系,方法会被调用得到之前单实例组件,用Full模式(默认)

IDEA快捷键:

  • Alt + Ins:生成getter,setter、构造器等代码。
  • Ctrl + Alt + B:查看类的具体实现代码。

@Import导入组件

@Bean、@Component、@Controller、@Service、@Repository,它们是Spring的基本标签,在Spring Boot中并未改变它们原来的功能。

用法一:

@Import({User.class, DBHelper.class})给容器中自动创建出这两个类型的组件、默认组件的名字就是全类名

1
2
//告诉SpringBoot这是一个配置类 == 配置文件public class MyConfig {}
@Import({User.class, DBHelper.class})@Configuration(proxyBeanMethods = false)

测试类:

1
2
3
4
5
6
7
8
9
10
11
12
13
14
//1、返回我们IOC容器
ConfigurableApplicationContext run = SpringApplication.run(MainApplication.class, args);

//...

//5、获取组件
String[] beanNamesForType = run.getBeanNamesForType(User.class);

for (String s : beanNamesForType) {
System.out.println(s);
}

DBHelper bean1 = run.getBean(DBHelper.class);
System.out.println(bean1);

**用法二:**定义一个类,来实现ImportSelector接口的 selectImports方法

1
2
3
4
5
6
public class MyImportSelector implements ImportSelector {
@Override
public String[] selectImports(AnnotationMetadata importingClassMetadata) {
return new String[] {"com.drlee.entity.Color", "com.drlee.entity.Person"};
}
}

**用法三:**通过 ImportBeanDefinitionRegistrar 方式导入的类。

这种方式目的是Spring让用户自己可以手动的注入Bean,Spring定义了ImportBeanDefinitionRegistrar这个接口

1
2
3
4
5
6
7
8
9
10
11
12
13
14
15
16
17
public class MyImportBeanDefinitionRegistrar implements ImportBeanDefinitionRegistrar {

/**
*
* @param AnnotationMetadata importingClassMetadata : 当前类的注解信息
* @param BeanDefinitionRegistry registry :Bean定义的注册类。
* ImportBeanDefinitionRegistrar#registerBeanDefinitions 把所有要添加的Bean,调用该方法手动注册到Spring容器中。
*/
@Override
public void registerBeanDefinitions(AnnotationMetadata importingClassMetadata, BeanDefinitionRegistry registry) {
// RootBeanDefinition可以将指定的Bean注入到Spring容器中
RootBeanDefinition rootBeanDefinition = new RootBeanDefinition(Color.class);
if (registry.containsBeanDefinition("person")) {
registry.registerBeanDefinition("Color", rootBeanDefinition);
}
}
}

@Conditional条件装配

条件装配:满足Conditional指定的条件,则进行组件注入(Ctrl+H快捷键可以查看实现)
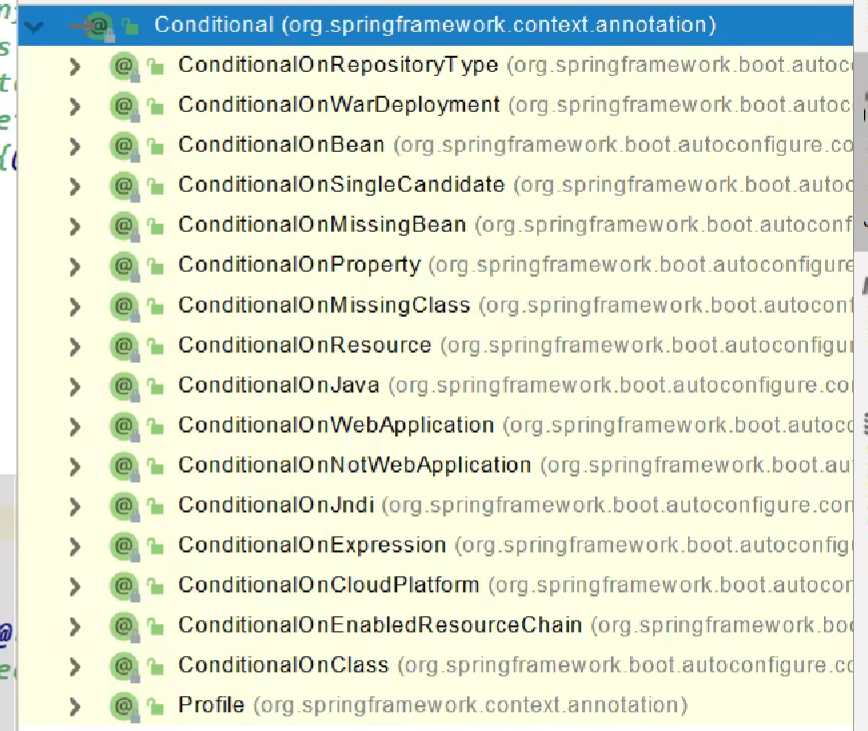
image-20230802161726303

用@ConditionalOnMissingBean举例说明

1
2
3
4
5
6
7
8
9
10
11
12
13
14
15
16
17
18
19
20
21
22
23
24
25
26
27
28
29
30
31
32
33
34
35
36
37
38
39
@Configuration(proxyBeanMethods = false)
//@ConditionalOnBean(name = "tom") //存在tom名字的Bean时,MyConfig类的Bean才能生效。
@ConditionalOnMissingBean(name = "tom")//没有tom名字的Bean时,MyConfig类的Bean才能生效。
public class MyConfig {

@Bean
public User user01(){
User zhangsan = new User("zhangsan", 18);
zhangsan.setPet(tomcatPet());
return zhangsan;
}

@Bean("tom22")
public Pet tomcatPet(){
return new Pet("tomcat");
}
}

//测试
public static void main(String[] args) {
//1、返回我们IOC容器
ConfigurableApplicationContext run = SpringApplication.run(MainApplication.class, args);

//2、查看容器里面的组件
String[] names = run.getBeanDefinitionNames();
for (String name : names) {
System.out.println(name);
}

boolean tom = run.containsBean("tom");
System.out.println("容器中Tom组件:"+tom);//false

boolean user01 = run.containsBean("user01");
System.out.println("容器中user01组件:"+user01);//true

boolean tom22 = run.containsBean("tom22");
System.out.println("容器中tom22组件:"+tom22);//true

}

原生配置文件引入

@ImportResource导入Spring配置文件

比如,公司使用bean.xml文件生成配置bean,然而你为了省事,想继续复用bean.xml,@ImportResource登场。

bean.xml:

1
2
3
4
5
6
7
8
9
10
<beans ...">
<bean id="haha" class="com.lun.boot.bean.User">
<property name="name" value="zhangsan"></property>
<property name="age" value="18"></property>
</bean>

<bean id="hehe" class="com.lun.boot.bean.Pet">
<property name="name" value="tomcat"></property>
</bean>
</beans>

使用方法:

1
2
@ImportResource("classpath:beans.xml")
public class MyConfig {...}

测试类:

1
2
3
4
5
6
7
8
9
10
11
public static void main(String[] args) {    
//1、返回我们IOC容器
ConfigurableApplicationContext run = SpringApplication.run(MainApplication.class, args);
// containsBean,容器中是否有该名字的组件
boolean haha = run.containsBean("haha");
boolean hehe = run.containsBean("hehe");
System.out.println("haha:"+haha);
//true
System.out.println("hehe:"+hehe);
//true
}

配置绑定

@ConfigurationProperties配置绑定

如何使用Java读取到properties文件中的内容,并且把它封装到JavaBean中,以供随时使用

传统方法:

1
2
3
4
5
6
7
8
9
10
11
12
13
public class getProperties {
public static void main(String[] args) throws FileNotFoundException, IOException {
Properties pps = new Properties();
pps.load(new FileInputStream("a.properties"));
Enumeration enum1 = pps.propertyNames();//得到配置文件的名字
while(enum1.hasMoreElements()) {
String strKey = (String) enum1.nextElement();
String strValue = pps.getProperty(strKey);
System.out.println(strKey + "=" + strValue);
//封装到JavaBean。
}
}
}

第一种配置绑定方法

@ConfigurationProperties + @Component

假设有配置文件application.properties

1
2
mycar.brand=BYD
mycar.price=100000

只有在容器中的组件,才会拥有SpringBoot提供的强大功能

1
2
3
4
5
6
7
8
@Component
@ConfigurationProperties(prefix = "mycar")
public class Car {
private String brand;
private Integer price;

...
}

第二种配置绑定方法

有些场景是需要给第三方的组件进行配置绑定。没办法加@Component注解

@ConfigurationProperties+@EnableConfigurationProperties

  1. 开启Car配置绑定功能

  2. 把这个Car这个组件自动注册到容器中

    实体类中:

    1
    2
    3
    4
    5
    6
    7
    @ConfigurationProperties(prefix = "mycar")
    public class Car {
    private String brand;
    private Integer price;

    ...
    }

    配置类中:

    1
    2
    3
    4
    @EnableConfigurationProperties(Car.class)
    public class MyConfig {
    ...
    }

对于自定义配置文件没有提示的问题

第一种方法,添加spring-boot-configuration-processor依赖。

1
2
3
4
5
<dependency>
<groupId>org.springframework.boot</groupId>
<artifactId>spring-boot-configuration-processor</artifactId>
<optional>true</optional>
</dependency>

第二种方法,使用@ConfigurationProperties+@EnableConfigurationProperties注解。

基础入门-自动配置原理入门

结构

  • @SpringBootApplication
    • @SpringBootConfiguration
      • @Configuration
    • @EnableAutoConfiguration
      • @AutoConfigurationPackage
        • @Import({Registrar.class})
      • @Import({AutoConfigurationImportSelector.class})
    • @ComponentScan()

Spring Boot应用的启动类:

1
2
3
4
5
6
7
@SpringBootApplication
public class MainApplication {

public static void main(String[] args) {
SpringApplication.run(MainApplication.class, args);
}
}

分析@SpringBootApplication

1
2
3
4
5
6
7
8
9
10
11
12
13
14
15
16
17
18
@Target(ElementType.TYPE)
@Retention(RetentionPolicy.RUNTIME)
@Documented
@Inherited
@SpringBootConfiguration
@EnableAutoConfiguration
@ComponentScan(
excludeFilters = {@Filter(
type = FilterType.CUSTOM,
classes = {TypeExcludeFilter.class}
), @Filter(
type = FilterType.CUSTOM,
classes = {AutoConfigurationExcludeFilter.class}
)}
)
public @interface SpringBootApplication {
...
}

重点分析@SpringBootConfiguration@EnableAutoConfiguration@ComponentScan

@SpringBootConfiguration

1
2
3
4
5
6
7
8
9
10
@Target(ElementType.TYPE)
@Retention(RetentionPolicy.RUNTIME)
@Documented
@Configuration //标明这是一个配置类
public @interface SpringBootConfiguration {
@AliasFor(
annotation = Configuration.class
)
boolean proxyBeanMethods() default true;
}

@Configuration代表当前是一个配置类。

@ComponentScan

指定扫描哪些Spring注解。

@EnableAutoConfiguration(重点)

1
2
3
4
5
6
7
8
9
10
11
12
13
@Target(ElementType.TYPE)
@Retention(RetentionPolicy.RUNTIME)
@Documented
@Inherited
@AutoConfigurationPackage
@Import(AutoConfigurationImportSelector.class)
public @interface EnableAutoConfiguration {
String ENABLED_OVERRIDE_PROPERTY = "spring.boot.enableautoconfiguration";

Class<?>[] exclude() default {};

String[] excludeName() default {};
}

重点分析@AutoConfigurationPackage@Import(AutoConfigurationImportSelector.class)

  • @AutoConfigurationPackage

    标签名直译为:自动配置包,指定了默认的包规则。

    1
    2
    3
    4
    5
    6
    7
    8
    9
    10
    11
    @Target(ElementType.TYPE)
    @Retention(RetentionPolicy.RUNTIME)
    @Documented
    @Inherited
    //利用Registrar给容器中导入一系列组件,将指定一个包下的所有组件导入进来,注册组件,证明组件的存在,而不是扫描
    // AutoConfigurationPackages.Registrar.class:将主类所在的包的类路径下面的所有组件注册进来
    @Import(AutoConfigurationPackages.Registrar.class)
    public @interface AutoConfigurationPackage {
    String[] basePackages() default {};
    Class<?>[] basePackageClasses() default {};
    }
    1
    2
    3
    4
    5
    6
    7
    8
    9
    10
    11
    12
    13
    static class Registrar implements ImportBeanDefinitionRegistrar, DeterminableImports {

    @Override
    public void registerBeanDefinitions(AnnotationMetadata metadata, BeanDefinitionRegistry registry) {
    register(registry, new PackageImports(metadata).getPackageNames().toArray(new String[0]));
    }

    @Override
    public Set<Object> determineImports(AnnotationMetadata metadata) {
    return Collections.singleton(new PackageImports(metadata));
    }

    }
    1. 利用Registrar给容器中导入一系列组件
    2. 将指定的一个包下的所有组件导入进MainApplication所在包下。
  • @Import(AutoConfigurationImportSelector.class)

    1. AutoConfigurationImportSelector中存在selectImports()方法,利用getAutoConfigurationEntry(annotationMetadata)方法给容器中批量导入一些组件

    2. getAutoConfigurationEntry()调用List<String> configurations = this.getCandidateConfigurations(annotationMetadata, attributes);方法获取到所有需要导入容器中的配置类

    3. getCandidateConfigurations()方法中调用了SpringFactoriesLoader的loadFactoryNames()静态方法。该静态方法内部调用本类(SpringFactoriesLoader)的loadSpringFactories()静态方法。

    4. 利用工厂加载 Map<String, List<String>> loadSpringFactories(ClassLoader classLoader);得到所有的组件

      1. Enumeration urls = classLoader.getResources("META-INF/spring.factories");从META-INF/spring.factories加载一个文件
      2. 默认扫描我们当前系统里面所有META-INF/spring.factories位置的文件
      3. spring-boot-autoconfigure-2.3.4.RELEASE.jar包里面也有META-INF/spring.factories,文件里面写死了spring-boot一启动就要给容器中加载的所有配置类
      1
      2
      3
      4
      5
      6
      7
      8
      9
      # Initializers
      org.springframework.context.ApplicationContextInitializer=\
      org.springframework.boot.autoconfigure.SharedMetadataReaderFactoryContextInitializer,\
      org.springframework.boot.autoconfigure.logging.ConditionEvaluationReportLoggingListener

      # Application Listeners
      org.springframework.context.ApplicationListener=\
      org.springframework.boot.autoconfigure.BackgroundPreinitializer
      ...
  • 按需开启自动配置

    @Conditional注解,按条件装配

    虽然我们127个场景的所有自动配置启动的时候默认全部加载了,但是哪些生效哪些不生效,按照条件装配规则,最终会按需配置。

总结:

  1. SpringBoot会在底层配置好所有的组件。但是如果用户自己配置了以用户的优先。
  2. SpringBoot先加载所有的自动配置类 xxxxxAutoConfiguration
  3. 每个自动配置类按照条件进行生效,默认都会绑定配置文件指定的值。(xxxxProperties里面读取,xxxProperties和配置文件进行了绑定)
  4. 生效的配置类就会给容器中装配很多组件
  5. 只要容器中有这些组件,相当于这些功能就有了
  6. 定制化配置
    • 用户直接自己@Bean替换底层的组件
    • 用户去看这个组件是获取的配置文件什么值就去修改。

xxxxxAutoConfiguration —>@EnableConfigurationProperties() 组件 —> xxxxProperties里面拿值 —-> application.properties(yaml)设置的值

最佳实践:

  • 引入场景依赖

    官方文档

  • 查看自动配置了哪些(选做)

    1
    2
    # 自动配置报告
    debug: true
    • 自己分析,引入场景对应的自动配置一般都生效了

    • 配置文件中debug=true开启自动配置报告。

      • Negative(不生效)
      • Positive(生效)
  • 是否需要修改

    • 参照文档修改配置项

      • 官方文档

      • 自己分析。xxxxProperties绑定了配置文件的哪些。

    • 自定义加入或者替换组件

      • @Bean、@Component…
    • 自定义器 XXXXXCustomizer;

dev-tools

1
2
3
4
5
<dependency>
<groupId>org.springframework.boot</groupId>
<artifactId>spring-boot-devtools</artifactId>
<optional>true</optional>
</dependency>

CTRL+F9重新编译,不用重启项目

付费:JRebel

核心功能

配置文件

YAML

1
2
3
4
5
6
7
8
9
10
11
12
13
14
15
16
17
18
19
20
21
22
23
24
@ConfigurationProperties(prefix = "person")
@Component
@Data
@ToString
public class Person {

private String userName;
private Boolean boss;
private Date birth;
private Integer age;
private Cat cat;
private String[] interests;
private List<String > animal;
private Map<String, Object> score;
private Set<Double> salarys;
private Map<String,List<Cat>> allCats;
}

@Data
public class Cat {

private String name;
private String color;
}
1
2
3
4
5
6
7
8
9
10
11
12
13
14
15
16
17
18
19
person:
userName: "zhangsan \n lisi"
# 双引号会换行输出
# 双引号不会进行转义,单引号会进行转义
boss: true
birth: 2019/12/09
age: 18
interests:
- "足球"
- "篮球"
animal: ["阿猫","啊狗"]
salarys: [999.2,333.4]
#score: {english: 80,math: 90}
cat:
name: "啊猫"
color: "蓝色"
score:
english: 80
math: 90

自定义类绑定的配置提示

添加依赖

1
2
3
4
5
<dependency>
<groupId>org.springframework.boot</groupId>
<artifactId>spring-boot-configuration-processor</artifactId>
<optional>true</optional>
</dependency>

这样,写一些自定义绑定的功能时YAML文件就有提示了

请求参数源码解析

静态资源访问

只要静态资源放在类路径下: /static ( /public,/resources,/META-INF/resources)

访问 : 当前项目根路径/ + 静态资源名

原理: 静态映射/**。

请求进来,先去找Controller看能不能处理。不能处理的所有请求又都交给静态资源处理器。静态资源也找不到则响应404页面。

也可以改变默认的静态资源路径/static/public,/resources, /META-INF/resources失效

1
2
resources:
static-locations: [classpath:/haha/]

静态资源访问前缀

1
2
3
spring:
mvc:
static-path-pattern: /res/**

当前项目 + static-path-pattern + 静态资源名 = 静态资源文件夹下找

自定义Favicon

指网页标签上的小图标。

favicon.ico 放在静态资源目录下即可。

1
2
3
spring:
# mvc:
# static-path-pattern: /res/** 这个会导致 Favicon 功能失效

静态资源配置原理(源码分析)

  • SpringBoot启动默认加载 xxxAutoConfiguration 类(自动配置类)

  • SpringMVC功能的自动配置类WebMvcAutoConfiguration,生效

    1
    2
    3
    4
    5
    6
    7
    8
    9
    10
    11
    12
    13
    @Configuration(
    proxyBeanMethods = false
    )
    @ConditionalOnWebApplication(
    type = Type.SERVLET
    )
    @ConditionalOnClass({Servlet.class, DispatcherServlet.class, WebMvcConfigurer.class})
    @ConditionalOnMissingBean({WebMvcConfigurationSupport.class})
    @AutoConfigureOrder(-2147483638)
    @AutoConfigureAfter({DispatcherServletAutoConfiguration.class, TaskExecutionAutoConfiguration.class, ValidationAutoConfiguration.class})
    public class WebMvcAutoConfiguration {
    ...
    }
  • **WebMvcAutoConfigurationAdapter()**给容器中配置的内容:

    • 配置文件的相关属性的绑定:WebMvcProperties==spring.mvc、ResourceProperties==spring.resources

      1
      2
      3
      4
      5
      6
      7
      8
      9
      @Configuration(
      proxyBeanMethods = false
      )
      @Import({WebMvcAutoConfiguration.EnableWebMvcConfiguration.class})
      @EnableConfigurationProperties({WebMvcProperties.class, ResourceProperties.class, WebProperties.class})
      @Order(0)
      public static class WebMvcAutoConfigurationAdapter implements WebMvcConfigurer {
      ...
      }

      配置类只有一个有参构造器

      1
      2
      3
      4
      5
      6
      7
      8
      9
      10
      11
      12
      13
      14
      15
      16
      17
      18
      19
      20
      21
      22
      23
      //有参构造器中的值都从容器中确定
      // ResourceProperties resourceProperties; 获取和spring.resources绑定的所有对象的值。
      // WebMvcProperties mvcProperties; 获取和spring.mvc绑定的所有对象的值。
      // ListableBeanFactory beanFactory; Spring的BeanFactory
      // HttpMessageConverters 找到所有的HttpHttpMessageConverters
      // ResourceHandlerRegistrationCustomizer; 找到资源处理器的自定义器
      // ServletRegistrationBean; 给应用注册原生的servlet、Filter
      public EnableWebMvcConfiguration(
      ResourceProperties resourceProperties,
      WebMvcProperties mvcProperties,
      WebProperties webProperties,
      ObjectProvider<WebMvcRegistrations> mvcRegistrationsProvider, ObjectProvider<WebMvcAutoConfiguration.ResourceHandlerRegistrationCustomizer> resourceHandlerRegistrationCustomizerProvider,
      ListableBeanFactory beanFactory) {
      this.resourceProperties = (Resources)(resourceProperties.hasBeenCustomized() ?
      resourceProperties : webProperties.getResources());
      this.mvcProperties = mvcProperties;
      this.webProperties = webProperties;
      this.mvcRegistrations = (WebMvcRegistrations)mvcRegistrationsProvider.getIfUnique();
      this.resourceHandlerRegistrationCustomizer =
      (WebMvcAutoConfiguration.ResourceHandlerRegistrationCustomizer)
      resourceHandlerRegistrationCustomizerProvider.getIfAvailable();
      this.beanFactory = beanFactory;
      }

      资源处理的默认规则

      1
      2
      3
      4
      5
      6
      7
      8
      9
      10
      11
      12
      13
      14
      15
      16
      17
      18
      19
      20
      21
      22
      23
      24
      protected void addResourceHandlers(ResourceHandlerRegistry registry) {
      super.addResourceHandlers(registry);
      if (!this.resourceProperties.isAddMappings()) {
      logger.debug("Default resource handling disabled");
      } else {
      ServletContext servletContext = this.getServletContext();

      //webjars的的规则
      this.addResourceHandler(registry, "/webjars/**",
      "classpath:/METAINF/resources/webjars/");

      //静态资源的访问目录
      //mvcProperties中的staticPathPattern属性可以设置静态资源访问前缀,
      //getStaticLocations()里有默认的静态资源访问路径,staticLocations属性可以设置路径指定路径
      this.addResourceHandler(registry, this.mvcProperties.getStaticPathPattern(),
      (registration) -> {
      registration.addResourceLocations(this.resourceProperties.getStaticLocations());
      if (servletContext != null) {
      registration.addResourceLocations(new Resource[]{
      new ServletContextResource(servletContext, "/")});
      }

      });
      }

      根据上述代码,我们可以同过配置禁用所有静态资源规则。

      1
      2
      3
      spring:
      resources:
      add-mappings: false #禁用所有静态资源规则
    • 欢迎页的处理规则

      1
      2
      3
      4
      5
      6
      7
      8
      9
      10
      11
      12
      13
      14
      15
      16
      17
      18
      19
      20
      21
      22
      23
      24
      25
      26
      //HandlerMapping:处理器映射器。保存了每一个Handler能处理哪些请求。

      @Bean
      public WelcomePageHandlerMapping welcomePageHandlerMapping(ApplicationContext applicationContext, FormattingConversionService mvcConversionService, ResourceUrlProvider mvcResourceUrlProvider) {
      WelcomePageHandlerMapping welcomePageHandlerMapping = new WelcomePageHandlerMapping(
      new TemplateAvailabilityProviders(applicationContext), applicationContext,
      this.getWelcomePage(), this.mvcProperties.getStaticPathPattern());
      welcomePageHandlerMapping.setInterceptors(
      this.getInterceptors(mvcConversionService, mvcResourceUrlProvider));
      welcomePageHandlerMapping.setCorsConfigurations(this.getCorsConfigurations());
      return welcomePageHandlerMapping;
      }

      WelcomePageHandlerMapping(TemplateAvailabilityProviders templateAvailabilityProviders, ApplicationContext applicationContext, Resource welcomePage, String staticPathPattern) {
      if (welcomePage != null && "/**".equals(staticPathPattern)) {
      //要使用欢迎页功能,必须使用/**,如果加有前缀,index又存在,视图就不会显示
      logger.info("Adding welcome page: " + welcomePage);
      this.setRootViewName("forward:index.html");
      }
      else if (this.welcomeTemplateExists
      (templateAvailabilityProviders, applicationContext)) {
      logger.info("Adding welcome page template: index");
      this.setRootViewName("index");
      }

      }

请求处理-【源码分析】-Rest映射及源码解析

  • @xxxMapping;

    • @GetMapping
    • @PostMapping
    • @PutMapping
    • @DeleteMapping
  • Rest风格支持(使用HTTP请求方式动词来表示对资源的操作)

    • 以前:
      /getUser 获取用户
      /deleteUser 删除用户
      /editUser 修改用户
      /saveUser保存用户
    • 现在: /user
      GET-获取用户
      DELETE-删除用户
      PUT-修改用户
      POST-保存用户
    • 核心Filter;HiddenHttpMethodFilter
  • 使用方法:

    • 开启页面表单的Rest功能

      1
      2
      3
      4
      5
      6
      # 使用Result风格的请求的时候,默认使用是false,要手动开启
      spring:
      mvc:
      hiddenmethod:
      filter:
      enabled: true
    • 页面 form的属性method=post,隐藏域 _method=put、delete等(如果直接get或post,无需隐藏域)

      1
      2
      3
      4
      5
      6
      7
      8
      9
      10
      11
      12
      13
      14
      15
      16
      17
      <form action="/user" method="get">
      <input value="REST-GET提交" type="submit" />
      </form>

      <form action="/user" method="post">
      <input value="REST-POST提交" type="submit" />
      </form>

      <form action="/user" method="post">
      <input name="_method" type="hidden" value="DELETE"/>
      <input value="REST-DELETE 提交" type="submit"/>
      </form>

      <form action="/user" method="post">
      <input name="_method" type="hidden" value="PUT" />
      <input value="REST-PUT提交"type="submit" />
      <form>
    • 编写请求映射

      1
      2
      3
      4
      5
      6
      7
      8
      9
      10
      11
      12
      13
      14
      15
      16
      17
      18
      19
      20
      @RequestMapping(value = "/user",method = RequestMethod.GET)
      public String getUser(){
      return "GET-张三";
      }

      @RequestMapping(value = "/user",method = RequestMethod.POST)
      public String saveUser(){
      return "POST-张三";
      }


      @RequestMapping(value = "/user",method = RequestMethod.PUT)
      public String putUser(){
      return "PUT-张三";
      }

      @RequestMapping(value = "/user",method = RequestMethod.DELETE)
      public String deleteUser(){
      return "DELETE-张三";
      }
  • Rest原理(表单提交要使用REST的时候)

    • 表单提交会带上\_method=PUT

    • 请求过来被WebMvcAutoConfigurationHiddenHttpMethodFilter(OrderedHiddenHttpMethodFilter是HiddenHttpMethodFilter的子类)拦截

      1
      2
      3
      4
      5
      6
      7
      8
      9
      10
      11
      12
      13
      protected void doFilterInternal(HttpServletRequest request, HttpServletResponse response, FilterChain filterChain) throws ServletException, IOException {
      HttpServletRequest requestToUse = request;
      if ("POST".equals(request.getMethod()) && request.getAttribute("javax.servlet.error.exception") == null) {
      String paramValue = request.getParameter(this.methodParam);
      if (StringUtils.hasLength(paramValue)) {
      String method = paramValue.toUpperCase(Locale.ENGLISH);
      if (ALLOWED_METHODS.contains(method)) {
      requestToUse = new HttpMethodRequestWrapper(request, method);
      }
      }
      }
      filterChain.doFilter((ServletRequest)requestToUse, response);
      }
      • 请求是否正常,并且是POST
        • 获取到_method的值,如果是小写,转换成大写
        • 兼容以下请求;PUT,DELETE,PATCH
        • 原生request(post),包装模式requesWrapper重写了getMethod方法,返回的是传入的值。
        • 过滤器链放行的时候用wrapper。以后的方法调用getMethod是调用requesWrapper的。
  • 修该默认的_method的值

    • @Configuration(proxyBeanMethods = false)
      @ConditionalOnWebApplication(type = Type.SERVLET)
      @ConditionalOnClass({Servlet.class, DispatcherServlet.class, WebMvcConfigurer.class})
      @ConditionalOnMissingBean({WebMvcConfigurationSupport.class})
      @AutoConfigureOrder(-2147483638)
      @AutoConfigureAfter({DispatcherServletAutoConfiguration.class, TaskExecutionAutoConfiguration.class, ValidationAutoConfiguration.class})
      public class WebMvcAutoConfiguration {
          ...
          
          @Bean
          @ConditionalOnMissingBean({HiddenHttpMethodFilter.class})
          @ConditionalOnProperty(
          prefix = "spring.mvc.hiddenmethod.filter",name = {"enabled"},matchIfMissing = false)
          public OrderedHiddenHttpMethodFilter hiddenHttpMethodFilter() {
              return new OrderedHiddenHttpMethodFilter();
          }
          
          ...
      }
      
      1
      2
      3
      4
      5
      6
      7
      8
      9
      10
      11
      12
      13
      14

      @ConditionalOnMissingBean(HiddenHttpMethodFilter.class)意味着在没有HiddenHttpMethodFilter时,才执行hiddenHttpMethodFilter()。因此,我们可以自定义filter,改变默认的\_method。例如:

      ~~~java
      @Configuration(proxyBeanMethods = false)
      public class WebConfig{
      //自定义filter
      @Bean
      public HiddenHttpMethodFilter hiddenHttpMethodFilter(){
      HiddenHttpMethodFilter methodFilter = new HiddenHttpMethodFilter();
      methodFilter.setMethodParam("_m");
      return methodFilter;
      }
      }
      将`_method`改成`_m`
      1
      2
      3
      4
      <form action="/user" method="post">
      <input name="_m" type="hidden" value="DELETE"/>
      <input value="REST-DELETE 提交" type="submit"/>
      </form>

请求映射原理(源码分析)

具体映射到那个方法上面处理请求

img

  1. 每个请求都会被DispatcherServlet进行拦截,DispatcherServlet继承FrameworkServlet–>HttpServletBean–>HttpServlet

  2. 但是,doGet等方法是在FrameworkServlet中进行重写的,所有方法都调用了本类的processRequest()方法

  3. 在processRequest中又创建了doService()的抽象方法,并在子类DispatcherServlet中进行了实现

  4. 重写的doService()中调用了本类的doDispatch()方法

  5. SpringMVC功能分析都从 org.springframework.web.servlet.DispatcherServlet -> doDispatch()

    1
    2
    3
    4
    5
    6
    7
    8
    9
    10
    11
    12
    13
    14
    15
    16
    17
    18
    19
    protected void doDispatch(HttpServletRequest request, HttpServletResponse response) throws Exception {
    HttpServletRequest processedRequest = request;
    HandlerExecutionChain mappedHandler = null;
    boolean multipartRequestParsed = false;
    WebAsyncManager asyncManager = WebAsyncUtils.getAsyncManager(request);
    try {
    try {
    ModelAndView mv = null;
    Object dispatchException = null;

    try {
    processedRequest = this.checkMultipart(request);
    multipartRequestParsed = processedRequest != request;
    // 找到当前请求使用哪个Handler(Controller的方法)处理
    mappedHandler = this.getHandler(processedRequest);
    //HandlerMapping:处理器映射。/xxx->>xxxx
    ....

    }

    getHandler()方法如下:

    1
    2
    3
    4
    5
    6
    7
    8
    9
    10
    11
    12
    13
    14
    15
    16
    17
    @Nullable
    protected HandlerExecutionChain getHandler(HttpServletRequest request) throws Exception {
    if (this.handlerMappings != null) {
    Iterator var2 = this.handlerMappings.iterator();

    while(var2.hasNext()) {
    HandlerMapping mapping = (HandlerMapping)var2.next();
    // 找到具体的映射处理器
    HandlerExecutionChain handler = mapping.getHandler(request);
    if (handler != null) {
    return handler;
    }
    }
    }

    return null;
    }

    this.handlerMappings在Debug模式下展现的内容:

    img

    其中,保存了所有@RequestMappinghandler的映射规则。

    img

    有的请求映射都在HandlerMapping中:

    SpringBoot自动配置欢迎页的 WelcomePageHandlerMapping 。访问 /能访问到index.html;

    SpringBoot自动配置了默认 的 RequestMappingHandlerMapping

    请求进来,挨个尝试所有的HandlerMapping看是否有请求信息。

    如果有就找到这个请求对应的handler

    如果没有就是下一个 HandlerMapping

    我们需要一些自定义的映射处理,我们也可以自己给容器中放HandlerMapping。自定义 HandlerMapping


    IDEA快捷键:

    • Ctrl + Alt + U : 以UML的类图展现类有哪些继承类,派生类以及实现哪些接口。
    • Crtl + Alt + Shift + U : 同上,区别在于上条快捷键结果在新页展现,而本条快捷键结果在弹窗展现。
    • Ctrl + H : 以树形方式展现类层次结构图。

请求处理常用参数注解使用

注解:

  • @PathVariable 路径变量(Result风格的请求)
  • @RequestHeader 获取请求头
  • @RequestParam 获取请求参数(指问号后的参数,url?a=1&b=2)
  • @CookieValue 获取Cookie值
  • @RequestBody 获取请求体[POST]
  • @RequestAttribute 获取request域属性(获取请求域中的值)
  • @MatrixVariable 矩阵变量
  • @ModelAttribute

使用案例:

1
2
3
4
5
6
7
8
9
10
11
12
13
14
15
16
17
18
19
20
21
22
23
24
25
26
27
28
29
30
31
32
33
34
35
36
37
@RestController
public class ParameterTestController {

@GetMapping("/car/{id}/owner/{username}")
public Map<String,Object> getCar(
@PathVariable("id") Integer id, //获取路径变量id
@PathVariable("username") String name, //获取路径变量name
@PathVariable Map<String,String> pv, //将获取的路径变量封装到map中
@RequestHeader("User-Agent") String userAge,//获取单个请求头
@RequestHeader Map<String,String> header, //获取所有的请求头
@RequestParam("age") Integer age, //获取请求参数age
@RequestParam List<String> insers, //获取请求参数的数组
@RequestParam Map<String,String> params, //获取请求参数所有的值封装到map中
@CookieValue("Pycharm-b78cf43a") String cookie, //获取cookie的值
@CookieValue("Pycharm-b78cf43a") Cookie cookies //获取cookie的所有信息
){
Map<String ,Object> map = new HashMap<>();
//map.put("id",id);
//map.put("name",name);
//map.put("pv",pv);
//map.put("User-Agent",userAge);
//map.put("header",header);
map.put("age",age);
map.put("insers",insers);
map.put("params",params);
map.put("cookie",cookie);
map.put("cookies",cookies);
return map;
}

@PostMapping("/save")
public Map<String,Object> postMethod(@RequestBody String name){
Map<String ,Object> map = new HashMap<>();
map.put("name",name);
return map;
}
}

前端页面:

1
2
3
4
5
6
7
8
9
<body>
<a href="/car/3/owner/张三?age=50&insers=ball&insers=back">连接/car/{id}/owner/{username}</a>
<br/>
<form method="post" action="/save">
<input type="text" name="name">
<input type="text" name="age">
<input type="submit" value="提交">
</form>
</body>

@RequestAttribute 的用法

使用案例:

访问goto请求转发到success中

1
2
3
4
5
6
7
8
9
10
11
12
13
14
15
16
17
18
19
20
21
@Controller
public class RequestController {

@GetMapping("/goto")
public String goToPage(HttpServletRequest request){
//存入Request域中的可以通过注解@RequestAttribute获取出来
request.setAttribute("msg","成功了");
request.setAttribute("code","马");
return "forward:/success"; //转发
}

@GetMapping("/success")
@ResponseBody
public Map success(@RequestAttribute("msg") String msg, @RequestAttribute("code") String code){
//@RequestAttribute("code")获取请求域中的值
Map<String ,Object> map = new HashMap<>();
map.put("msg",msg);
map.put("code",code);
return map;
}
}

@MatrixVariable 矩阵变量的用法

语法-请求路径:

  • /cars/sell;low=34;brand=byd,audi,yd(将sell分号后面的和sell看成一个整体,多个值以分号分开)

页面开发,cookie的值被禁用了,session怎么使用

session.set(a,b)—>存在jsessionid—>保存在cookie中—>每次请求携带

解决方法:url重写/abc;jsessionid=xxx 把cookie的值以矩阵变量的方式进行传递。

  1. SpringBoot默认是禁用了矩阵变量的功能
    • 手动开启:原理。对于路径的处理。UrlPathHelper的removeSemicolonContent设置为false,让其支持矩阵变量的。
  2. 矩阵变量必须有url路径变量才能被解析

手动开启矩阵变量

WebMvcAutoConfiguration中有一个内部类实现了WebMvcConfigurer接口,重写了configurePathMatch方法();

1
2
3
4
5
6
7
8
9
10
11
@Configuration(proxyBeanMethods = false)
public class WebConfig implements WebMvcConfigurer {
@Override
public void configurePathMatch(PathMatchConfigurer configurer) {

UrlPathHelper urlPathHelper = new UrlPathHelper();
// 不移除;后面的内容。矩阵变量功能就可以生效
urlPathHelper.setRemoveSemicolonContent(false);
configurer.setUrlPathHelper(urlPathHelper);
}
}

两种办法解决:

  • 实现WebMvcConfigurer重写configurePathMatch()方法

  • 向容器中添加组件

1
2
3
4
5
6
7
8
9
10
11
12
13
14
15
16
17
18
19
20
21
22
23
24
25
26
27
@Configuration(proxyBeanMethods = false)
public class WebConfig implements WebMvcConfigurer {

//实现接口重写方法
@Override
public void configurePathMatch(PathMatchConfigurer configurer) {
UrlPathHelper urlPathHelper = new UrlPathHelper();
//默认移除分号后面的内容,设置不移除
urlPathHelper.setRemoveSemicolonContent(false);
configurer.setUrlPathHelper(urlPathHelper);

}

//向容器中添加组件
//@Bean
//public WebMvcConfigurer webMvcConfigurer(){
// return new WebMvcConfigurer() {
// @Override
// public void configurePathMatch(PathMatchConfigurer configurer) {
// UrlPathHelper urlPathHelper = new UrlPathHelper();
// //默认移除分号后面的内容,设置不移除
// urlPathHelper.setRemoveSemicolonContent(false);
// configurer.setUrlPathHelper(urlPathHelper);
// }
// };
//}
}

参数处理原理(源码分析)

1
2
3
4
5
6
7
8
9
10
11
12
13
14
protected void doDispatch(HttpServletRequest request, HttpServletResponse response) throws Exception {
...
// 找到具体的Handler
mappedHandler = getHandler(processedRequest);
...
// 根据找到的Handler找到具体的HandlerAdapter,处理器适配器
HandlerAdapter ha = getHandlerAdapter(mappedHandler.getHandler());
...
// 执行目标方法
mv = ha.handle(processedRequest, response, mappedHandler.getHandler());
...
// 处理派发结果
processDispatchResult(processedRequest, response, mappedHandler, mv, dispatchException);
}
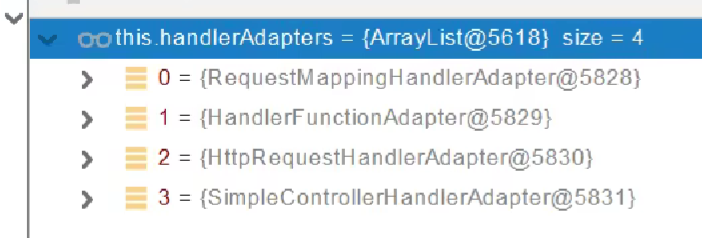
  • HandlerMapping中找到处理请求的Handler(Controller的哪个方法)

  • 为当前找到的Handler招一个适配器HandlerAdapter;RequestMappingHandlerAdapter

    image-20230805221239411
    • 0 - 支持方法上标注@RequestMapping
    • 1 - 支持函数式编程

执行目标方法

  • 在RequestMappingHandlerAdapter类里面执行了目标方法

    1
    2
    3
    4
    5
    RequestMappingHandlerAdapter
    // 执行目标方法
    mav = invokeHandlerMethod(request, response, handlerMethod);
    // invokeHandlerMethod 方法里面执行了 invokeAndHandle
    invocableMethod.invokeAndHandle(webRequest, mavContainer);

参数解析器(invokeHandlerMethod方法里面)

确定将要执行的目标方法的每一个参数值是什么

image-20230805222910493

image-20230805223435825

当前解析器是否支持解析这种参数,是就调用resolveArgument进行解析

1
2
3
4
5
6
7
8
9
10
11
12
13
14
15
16
17
18
@Nullable
private HandlerMethodArgumentResolver getArgumentResolver(MethodParameter parameter) {
HandlerMethodArgumentResolver result = (HandlerMethodArgumentResolver)this.argumentResolverCache.get(parameter);
if (result == null) {
Iterator var3 = this.argumentResolvers.iterator();

while(var3.hasNext()) {
HandlerMethodArgumentResolver resolver = (HandlerMethodArgumentResolver)var3.next();
// 判断那个解析器能处理这个参数
if (resolver.supportsParameter(parameter)) {
result = resolver;
this.argumentResolverCache.put(parameter, resolver);
break;
}
}
}
return result;
}

返回值处理器(invokeHandlerMethod方法里面)

image-20230805223607115

确定目标方法每一个参数的值

挨个判断所有参数解析器
1
2
3
4
5
6
7
ServletInvocableHandlerMethod
// 真正执行目标方法
Object returnValue = invokeForRequest(webRequest, mavContainer, providedArgs);

InvocableHandlerMethod
// 获取方法参数值
Object[] args = this.getMethodArgumentValues(request, mavContainer, providedArgs);
1
2
3
4
5
6
7
8
9
10
11
12
13
14
15
16
17
18
19
20
21
22
23
24
25
26
27
28
29
30
31
32
33
34
35
36
37
protected Object[] getMethodArgumentValues(NativeWebRequest request, @Nullable ModelAndViewContainer mavContainer, Object... providedArgs) throws Exception {
//获得参数的详细信息
MethodParameter[] parameters = this.getMethodParameters();
if (ObjectUtils.isEmpty(parameters)) {
return EMPTY_ARGS;
} else {
Object[] args = new Object[parameters.length];

for(int i = 0; i < parameters.length; ++i) {
MethodParameter parameter = parameters[i];
parameter.initParameterNameDiscovery(this.parameterNameDiscoverer);
args[i] = findProvidedArgument(parameter, providedArgs);
if (args[i] == null) {
// 挨个确定26个参数解析器那个支持这个参数(遍历到的参数列表的参数)
if (!this.resolvers.supportsParameter(parameter)) {
throw new IllegalStateException(formatArgumentError(parameter, "No suitable resolver"));
}

try {
// 解析这个参数的值
args[i] = this.resolvers.resolveArgument(parameter, mavContainer, request, this.dataBinderFactory);
} catch (Exception var10) {
if (logger.isDebugEnabled()) {
String exMsg = var10.getMessage();
if (exMsg != null && !exMsg.contains(parameter.getExecutable().toGenericString())) {
logger.debug(formatArgumentError(parameter, exMsg));
}
}

throw var10;
}
}
}

return args;
}
}
解析这个参数的值
1
调用HandlerMethodArgumentResolver的resolveArgument方法即可
自定义类型参数 封装POJO

ModelAttributeMethodProcessor 这个参数解析器支持自定义对象参数。

1
2
3
4
5
6
7
8
9
10
11
12
13
14
15
public static boolean isSimpleValueType(Class<?> type) {
return Void.class != type &&
Void.TYPE != type &&
(ClassUtils.isPrimitiveOrWrapper(type) ||
Enum.class.isAssignableFrom(type) ||
CharSequence.class.isAssignableFrom(type) ||
Number.class.isAssignableFrom(type) ||
Date.class.isAssignableFrom(type) ||
Temporal.class.isAssignableFrom(type) ||
URI.class == type ||
URL.class == type ||
Locale.class == type ||
Class.class == type);
}

1
2
3
4
5
6
7
8
9
10
11
12
13
14
15
16
17
18
19
20
21
22
23
24
25
26
27
28
29
30
31
32
33
34
35
36
37
38
39
40
41
42
43
44
45
46
47
48
49
50
51
52
53
54
55
56
57
58
59
60
61
62
63
64
65
66
67
68
69
70
71
@Override
@Nullable
public final Object resolveArgument(MethodParameter parameter, @Nullable ModelAndViewContainer mavContainer,
NativeWebRequest webRequest, @Nullable WebDataBinderFactory binderFactory) throws Exception {

Assert.state(mavContainer != null, "ModelAttributeMethodProcessor requires ModelAndViewContainer");
Assert.state(binderFactory != null, "ModelAttributeMethodProcessor requires WebDataBinderFactory");

String name = ModelFactory.getNameForParameter(parameter);
ModelAttribute ann = parameter.getParameterAnnotation(ModelAttribute.class);
if (ann != null) {
mavContainer.setBinding(name, ann.binding());
}

Object attribute = null;
BindingResult bindingResult = null;

if (mavContainer.containsAttribute(name)) {
attribute = mavContainer.getModel().get(name);
}
else {
// Create attribute instance
try {
// 创建一个空对象
attribute = createAttribute(name, parameter, binderFactory, webRequest);
}
catch (BindException ex) {
if (isBindExceptionRequired(parameter)) {
// No BindingResult parameter -> fail with BindException
throw ex;
}
// Otherwise, expose null/empty value and associated BindingResult
if (parameter.getParameterType() == Optional.class) {
attribute = Optional.empty();
}
else {
attribute = ex.getTarget();
}
bindingResult = ex.getBindingResult();
}
}

if (bindingResult == null) {
// Bean property binding and validation;
// web数据绑定器,将请求参数的值绑定到指定的javaBean里面。
// WebDataBinder 利用它里面的Converters将请求数据转成指定的数据类型。
WebDataBinder binder = binderFactory.createBinder(webRequest, attribute, name);
if (binder.getTarget() != null) {
if (!mavContainer.isBindingDisabled(name)) {
// 将数据封装到javaBean中
bindRequestParameters(binder, webRequest);
}
validateIfApplicable(binder, parameter);
if (binder.getBindingResult().hasErrors() && isBindExceptionRequired(binder, parameter)) {
throw new BindException(binder.getBindingResult());
}
}
// Value type adaptation, also covering java.util.Optional
if (!parameter.getParameterType().isInstance(attribute)) {
attribute = binder.convertIfNecessary(binder.getTarget(), parameter.getParameterType(), parameter);
}
bindingResult = binder.getBindingResult();
}

// Add resolved attribute and BindingResult at the end of the model
Map<String, Object> bindingResultModel = bindingResult.getModel();
mavContainer.removeAttributes(bindingResultModel);
mavContainer.addAllAttributes(bindingResultModel);

return attribute;
}

WebDataBinder binder = binderFactory.createBinder(webRequest, attribute, name);

web数据绑定器,将请求参数的值绑定到指定的javaBean里面。

WebDataBinder 利用它里面的Converters将请求数据转成指定的数据类型。

目标方法执行完成

将所有数据放在ModelAndViewContainer里面;包含要去的页面地址View,还包含Model的数据。
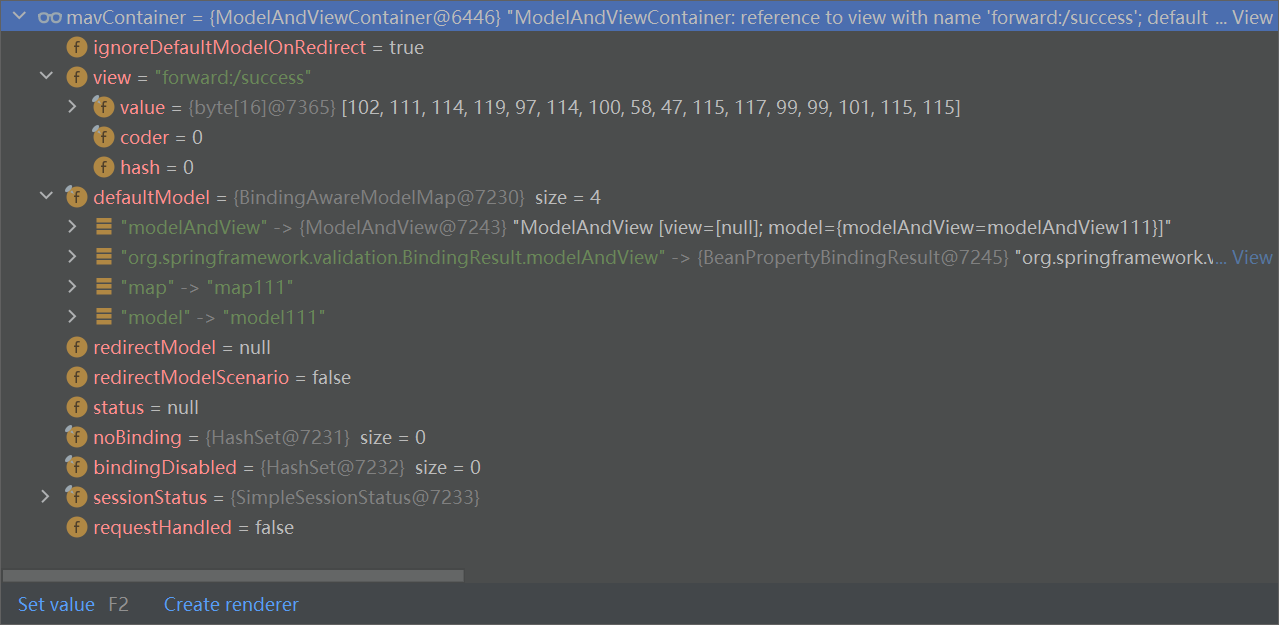
image-20230807183513420

处理派发结果

processDispatchResult(processedRequest, response, mappedHandler, mv, dispatchException);

复杂参数

1
2
3
4
// Controller用一下参数接受时
Map<String,Object> map,Model model,HttpServletRequest request;
// 都是可以给request域中放数据
// 可以使用 request获取

Map和Model类型的参数会返回mavContainer.getModel()获取到值的。

image-20230807175746050

1
2
3
4
5
6
7
8
9
10
11
12
13
14
15
16
17
18
19
20
21
22
23
24
25
26
27
28
29
30
31
32
33
34
35
36
37
38
39
40
41
42
43
44
45
46
47
render(mv, request, response);

AbstractView
@Override
public void render(@Nullable Map<String, ?> model, HttpServletRequest request,
HttpServletResponse response) throws Exception {
...
renderMergedOutputModel(mergedModel, getRequestToExpose(request), response);
}

@Override
protected void renderMergedOutputModel(
Map<String, Object> model, HttpServletRequest request, HttpServletResponse response) throws Exception {

// 暴露模型作为请求域的属性
exposeModelAsRequestAttributes(model, request);

// Expose helpers as request attributes, if any.
exposeHelpers(request);

// Determine the path for the request dispatcher.
String dispatcherPath = prepareForRendering(request, response);

// Obtain a RequestDispatcher for the target resource (typically a JSP).
RequestDispatcher rd = getRequestDispatcher(request, dispatcherPath);
if (rd == null) {
throw new ServletException("Could not get RequestDispatcher for [" + getUrl() +
"]: Check that the corresponding file exists within your web application archive!");
}

// If already included or response already committed, perform include, else forward.
if (useInclude(request, response)) {
response.setContentType(getContentType());
if (logger.isDebugEnabled()) {
logger.debug("Including [" + getUrl() + "]");
}
rd.include(request, response);
}

else {
// Note: The forwarded resource is supposed to determine the content type itself.
if (logger.isDebugEnabled()) {
logger.debug("Forwarding to [" + getUrl() + "]");
}
rd.forward(request, response);
}
}

自定义对象参数原理

1
2
3
4
5
6
7
8
9
10
11
12
13
14
15
16
17
18
19
@Data
public class Person {
private String userName;
private Boolean boss;
private Date birth;
private Integer age;
private Cat cat;
private String[] interests;
private List<String > animal;
private Map<String, Object> score;
private Set<Double> salarys;
private Map<String,List<Cat>> allCats;
}

@Data
public class Cat {
private String name;
private String color;
}

ModelAttributeMethodProcessor 这个参数解析器支持自定义对象参数。

自定义Converter

1
2
3
4
5
6
7
8
9
10
11
12
13
14
15
16
17
18
19
20
21
22
23
24
25
26
@Configuration
public class WebConfig {

@Bean
public WebMvcConfigurer mvcConfigurer(){

return new WebMvcConfigurer() {
@Override
public void addFormatters(FormatterRegistry registry) {
registry.addConverter(new Converter<String, Cat>() {
@Override
public Cat convert(String source) {
if (!StringUtils.isEmpty(source)){
Cat cat = new Cat();
String[] split = source.split(",");
cat.setName(split[0]);
cat.setColor(split[1]);
return cat;
}
return null;
}
});
}
};
}
}

数据响应与内容协商

返回值解析器原理

只要导入了spring-boot-starter-web的依赖,就会自动导入json的依赖

1
2
3
4
<dependency>
<groupId>org.springframework.boot</groupId>
<artifactId>spring-boot-starter-web</artifactId>
</dependency>
1
2
3
4
5
6
7
8
9
10
11
12
13
14
15
public void invokeAndHandle(ServletWebRequest webRequest, ModelAndViewContainer mavContainer,
Object... providedArgs) throws Exception {
..
try {
// 处理返回值
this.returnValueHandlers.handleReturnValue(
returnValue, getReturnValueType(returnValue), mavContainer, webRequest);
}
catch (Exception ex) {
if (logger.isTraceEnabled()) {
logger.trace(formatErrorForReturnValue(returnValue), ex);
}
throw ex;
}
}
1
2
3
4
5
6
7
8
9
10
@Override
public void handleReturnValue(@Nullable Object returnValue, MethodParameter returnType,
ModelAndViewContainer mavContainer, NativeWebRequest webRequest) throws Exception {

HandlerMethodReturnValueHandler handler = selectHandler(returnValue, returnType);
if (handler == null) {
throw new IllegalArgumentException("Unknown return value type: " + returnType.getParameterType().getName());
}
handler.handleReturnValue(returnValue, returnType, mavContainer, webRequest);
}

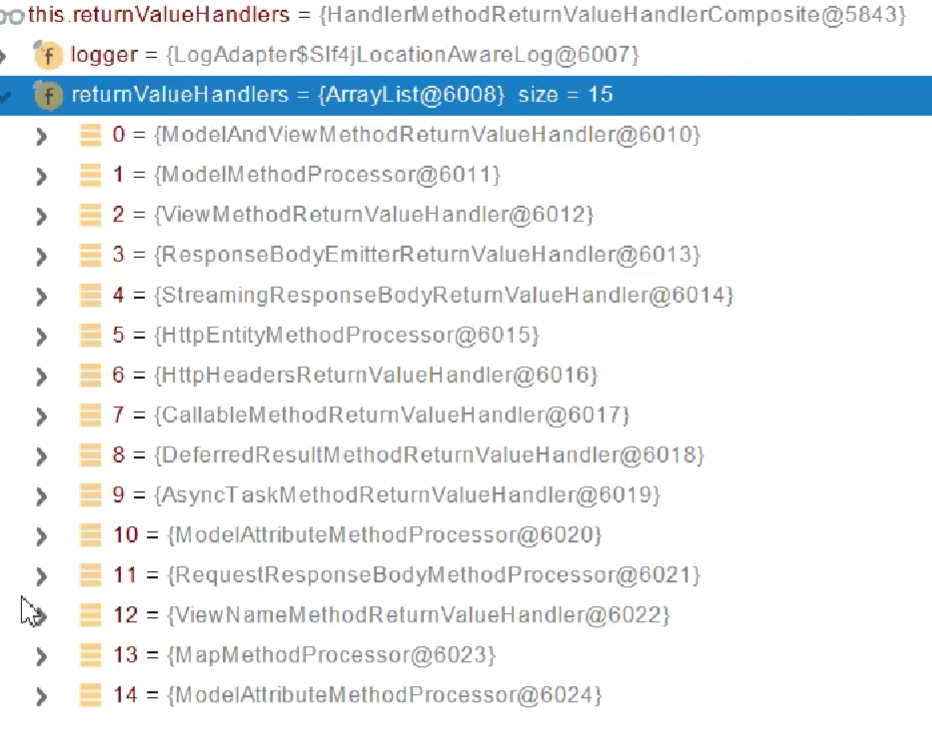
image-20230808235145874

返回值处理器判断是否支持这种类型的返回值supportsReturnType,如果支持在调用返回值处理器handleReturnValue

1
2
3
4
5
6
7
8
9
10
11
12
@Override
public void handleReturnValue(@Nullable Object returnValue, MethodParameter returnType,
ModelAndViewContainer mavContainer, NativeWebRequest webRequest)
throws IOException, HttpMediaTypeNotAcceptableException, HttpMessageNotWritableException {

mavContainer.setRequestHandled(true);
ServletServerHttpRequest inputMessage = createInputMessage(webRequest);
ServletServerHttpResponse outputMessage = createOutputMessage(webRequest);

// 使用消息转换器进行写入操作
writeWithMessageConverters(returnValue, returnType, inputMessage, outputMessage);
}

RequestResponseBodyMethodProcessor可以处理返回值标注了@ResponseBody注解的。

  • 利用MessageConverters进行处理 将数据写为json

    • 内容协商(浏览器会以请求头的方式告诉服务器,它能接受什么样的类型)
    • 服务器最终根据自己自身的能力,决定服务器能生产出什么样内容类型的数据。
    • SpringMVC会挨个遍历所有容器底层的消息转换器HttpMessageConverter

    image-20230809155102293

    HttpMessageConverter看是否支持将此Class类型的数据转成MediaType类型的数据。

    举例:是否支持将Person类型的数据转换成json类型的数据。

    • 得到MappingJackson2HttpMessageConverter可以将对象转成JSON

系统默认的MessageConverter
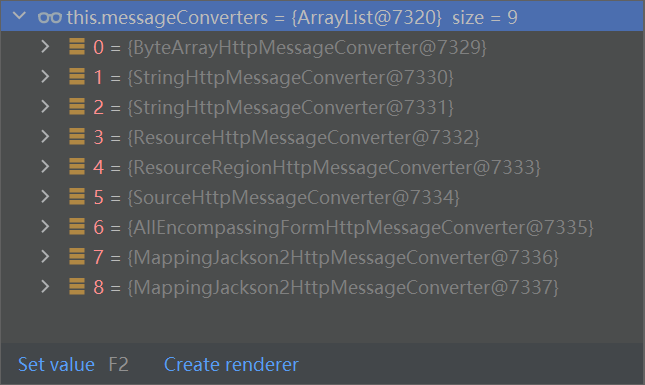
image-20230809160637710

内容协商

根据不同的客户端接收能力不同,返回不同类型的数据。

比如说:网页返回JSON数据,安卓客户端返回xml类型的数据。

引入xml依赖

1
2
3
4
<dependency>
<groupId>com.fasterxml.jackson.dataformat</groupId>
<artifactId>jackson-dataformat-xml</artifactId>
</dependency>

内容协商原理

1
2
3
4
5
6
7
8
9
10
11
12
13
14
15
16
17
18
19
20
21
22
23
24
25
26
27
28
29
30
31
32
33
34
35
36
37
38
39
40
41
42
43
44
45
46
47
48
49
50
51
52
53
54
55
56
57
58
59
60
61
62
63
64
65
66
67
68
69
70
71
72
73
74
75
76
77
78
79
80
81
82
83
84
protected <T> void writeWithMessageConverters(@Nullable T value, MethodParameter returnType,
ServletServerHttpRequest inputMessage, ServletServerHttpResponse outputMessage)
throws IOException, HttpMediaTypeNotAcceptableException, HttpMessageNotWritableException {
...
MediaType selectedMediaType = null;
MediaType contentType = outputMessage.getHeaders().getContentType();
// 判断当前响应头中是否已经有了媒体类型,有就用自己的
boolean isContentTypePreset = contentType != null && contentType.isConcrete();
if (isContentTypePreset) {
if (logger.isDebugEnabled()) {
logger.debug("Found 'Content-Type:" + contentType + "' in response");
}
selectedMediaType = contentType;
}
else {
HttpServletRequest request = inputMessage.getServletRequest();
List<MediaType> acceptableTypes;
try {
// 获取当前客户端能接收的内容类型
acceptableTypes = getAcceptableMediaTypes(request);
}
catch (HttpMediaTypeNotAcceptableException ex) {
int series = outputMessage.getServletResponse().getStatus() / 100;
if (body == null || series == 4 || series == 5) {
if (logger.isDebugEnabled()) {
logger.debug("Ignoring error response content (if any). " + ex);
}
return;
}
throw ex;
}
// 获取我们能产生的媒体类型
List<MediaType> producibleTypes = getProducibleMediaTypes(request, valueType, targetType);

if (body != null && producibleTypes.isEmpty()) {
throw new HttpMessageNotWritableException(
"No converter found for return value of type: " + valueType);
}
// 循环判断我们产生的媒体类型,那些是客户端支持的
List<MediaType> mediaTypesToUse = new ArrayList<>();
for (MediaType requestedType : acceptableTypes) {
for (MediaType producibleType : producibleTypes) {
if (requestedType.isCompatibleWith(producibleType)) {
mediaTypesToUse.add(getMostSpecificMediaType(requestedType, producibleType));
}
}
}
...
if (selectedMediaType != null) {
selectedMediaType = selectedMediaType.removeQualityValue();
for (HttpMessageConverter<?> converter : this.messageConverters) {
GenericHttpMessageConverter genericConverter = (converter instanceof GenericHttpMessageConverter ?
(GenericHttpMessageConverter<?>) converter : null);
// 找到能将对象转成xml的MessageConverter
if (genericConverter != null ?
((GenericHttpMessageConverter) converter).canWrite(targetType, valueType, selectedMediaType) :
converter.canWrite(valueType, selectedMediaType)) {
body = getAdvice().beforeBodyWrite(body, returnType, selectedMediaType,
(Class<? extends HttpMessageConverter<?>>) converter.getClass(),
inputMessage, outputMessage);
if (body != null) {
Object theBody = body;
LogFormatUtils.traceDebug(logger, traceOn ->
"Writing [" + LogFormatUtils.formatValue(theBody, !traceOn) + "]");
addContentDispositionHeader(inputMessage, outputMessage);
if (genericConverter != null) {
// 写出xml
genericConverter.write(body, targetType, selectedMediaType, outputMessage);
}
else {
((HttpMessageConverter) converter).write(body, selectedMediaType, outputMessage);
}
}
else {
if (logger.isDebugEnabled()) {
logger.debug("Nothing to write: null body");
}
}
return;
}
}
}
}
}
  1. 判断当前响应头中是否已经有确定的媒体类型。MediaType。
  2. 获取客户端支持接收的内容类型。(获取客户端的Accepte请求头)
  3. 遍历当前所有系统的MessageConverter,看谁支持操作这个对象(返回值:person)
  4. 找到支持操作person的消息转换器MessageConverter,把converter支持的所有媒体类型统计出来。
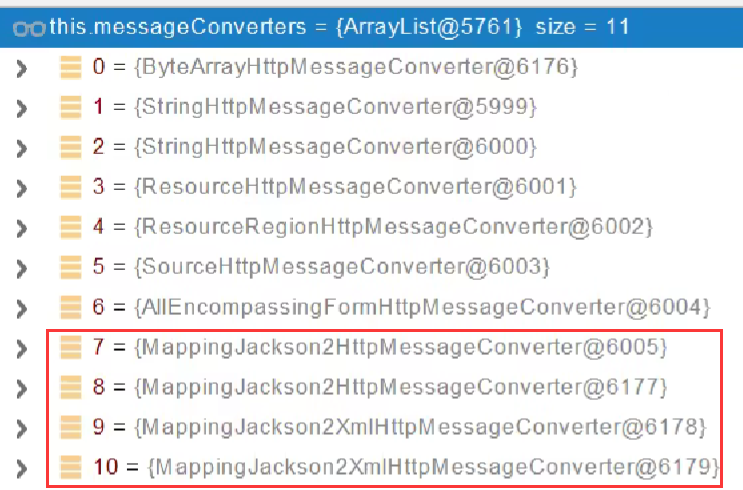
image-20230809171335011
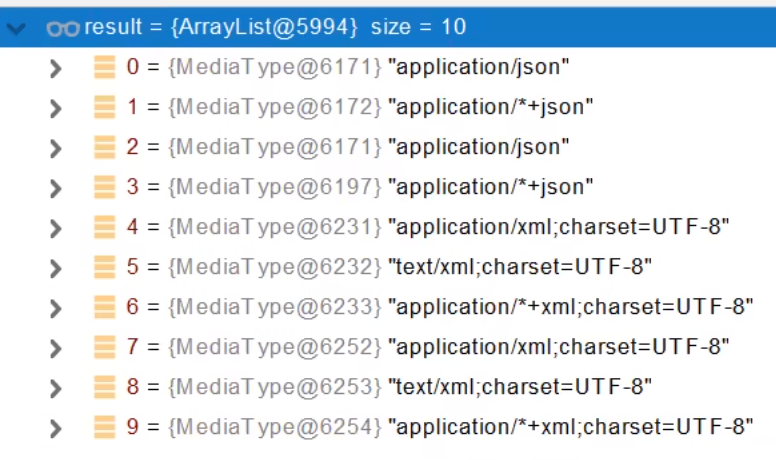
  1. 客户端需要application/xml。服务端的能力【10种】
image-20230809170447776
  1. 进行内容协商的最佳匹配
  2. 支持将对象转为最佳匹配的媒体类型的converter。将它进行转换。

开启浏览器参数方式内容协商功能

为了方便内容协商,开启基于请求参数的内容协商功能。

1
2
3
4
spring:
mvc:
contentnegotiation:
favor-parameter: true # 开启请求参数内容协商

请求参数中添加format参数

发请求:http://localhost:8080/person?format=json

http://localhost:8080/person?format=xml

自定义 MessageConverter

1
2
3
4
5
6
7
8
9
10
11
12
13
14
15
16
17
18
19
20
21
22
23
24
25
26
27
28
29
30
31
32
33
34
public class GuiguMessageConverter implements HttpMessageConverter<Person> {
@Override
public boolean canRead(Class clazz, MediaType mediaType) {
return false;
}

@Override
public boolean canWrite(Class clazz, MediaType mediaType) {
return clazz.isAssignableFrom(Person.class);
}

/***
* 服务器要统计所有MessageConverter都能写出那种数据类型
* @return
*/
@Override
public List<MediaType> getSupportedMediaTypes() {
return MediaType.parseMediaTypes("application/x-guigu");
}

@Override
public Person read(Class clazz, HttpInputMessage inputMessage) throws IOException, HttpMessageNotReadableException {
return null;
}

@Override
public void write(Person person, MediaType contentType, HttpOutputMessage outputMessage) throws IOException, HttpMessageNotWritableException {
// 自定义协议数据写出
String data = person.getUserName()+";"+person.getAge();
// 写出去
OutputStream body = outputMessage.getBody();
body.write(data.getBytes());
}
}
1
2
3
4
5
6
7
8
9
10
11
12
13
14
15
16
17
18
19
20
@Bean
public WebMvcConfigurer mvcConfigurer(){
return new WebMvcConfigurer() {
@Override
public void extendMessageConverters(List<HttpMessageConverter<?>> converters) {
converters.add(new GuiguMessageConverter());
}
// 支持参数format的形式和header形式
@Override
public void configureContentNegotiation(ContentNegotiationConfigurer configurer) {
HashMap<String, MediaType> mediaTypes = new HashMap<>();
mediaTypes.put("json",MediaType.APPLICATION_JSON);
mediaTypes.put("xml",MediaType.APPLICATION_XML);
mediaTypes.put("X-guigu",MediaType.parseMediaType("application/x-guigu"));
ParameterContentNegotiationStrategy parameterStrategy = new ParameterContentNegotiationStrategy(mediaTypes);
HeaderContentNegotiationStrategy headerStrategy = new HeaderContentNegotiationStrategy();
configurer.strategies(Arrays.asList(parameterStrategy,headerStrategy));
}
};
}

thymeleaf的使用

引入thymeleaf的依赖

1
2
3
4
<dependency>
<groupId>org.springframework.boot</groupId>
<artifactId>spring-boot-starter-thymeleaf</artifactId>
</dependency>

自动配好的策略

  1. 所有thymeleaf的配置值都在 ThymeleafProperties

  2. 配置好了 SpringTemplateEngine主引擎

  3. 配好了 ThymeleafViewResolver视图解析器

  4. 我们只需要直接开发页面

    1
    2
    public static final String DEFAULT_PREFIX = "classpath:/templates/";//模板放置处
    public static final String DEFAULT_SUFFIX = ".html";//文件的后缀名

视图解析源码分析

  1. 目标方法处理过程中,所有数据都会被放在ModelAndViewContainer里面。包括数据和视图地址。
  2. 方法的参数是一个自定义类型对象(从请求参数中确定的)。把重新放在ModelAndViewContainer
  3. 任何目标方法执行完成都会返回一个ModelAndView对象(数据和视图地址)。
  4. processDispatchResult 处理派发结果(页面如何响应)
    1. render(mv,request,response);进行页面渲染
      • 根据方法的String返回值得到View对象
        • 所有视图解析器尝试是否能根据当前返回值得到View对象
        • 得到了 redirect:/main:html –> Thymeleaf new RedirectView()
        • ContentNegotiationViewResolver 里面包含了下面所有的视图,内部还是利用下面所有视图解析器得到视图对象。
        • 调用view.render(mv.getModelInternal(), request, response);进行页面渲染工作

image-20230810215734476

拦截器

  1. 编写一个拦截器实现HandlerInterceptor接口
  2. 拦截器注册到容器中(实现WebMvcConfigureraddInterceptors()
  3. 指定拦截规则(注意,如果是拦截所有,静态资源也会被拦截

使用示例:

编写一个实现HandlerInterceptor接口的拦截器:

1
2
3
4
5
6
7
8
9
10
11
12
13
14
15
16
17
18
19
20
21
22
23
24
25
26
27
28
29
30
31
32
33
34
35
36
37
38
39
40
41
42
43
44
45
46
47
48
49
50
51
52
53
54
55
56
57
58
59
60
/**
* 登录检查
* 1.配置好拦截器要拦截哪些请求
* 2.把这些配置放到容器中
*/
public class LoginInterceptor implements HandlerInterceptor {

/**
* 目标方法执行之前
* @param request
* @param response
* @param handler
* @return
* @throws Exception
*/
@Override
public boolean preHandle(HttpServletRequest request, HttpServletResponse response,
Object handler) throws Exception {
StringBuffer requestURL = request.getRequestURL();
System.out.println("拦截的请求是"+requestURL);


HttpSession session = request.getSession();
Object user = session.getAttribute("user");
if(user != null){
//放行
return true;
}
//拦截住后跳转到登录页面
response.sendRedirect("/");
return false;
}

/**
* 目标方法执行之后
* @param request
* @param response
* @param handler
* @param modelAndView
* @throws Exception
*/
@Override
public void postHandle(HttpServletRequest request, HttpServletResponse response,
Object handler, ModelAndView modelAndView) throws Exception {

}

/**
* 视图渲染完成后
* @param request
* @param response
* @param handler
* @param ex
* @throws Exception
*/
@Override
public void afterCompletion(HttpServletRequest request, HttpServletResponse response,
Object handler, Exception ex) throws Exception {

}

拦截器注册到容器中 && 指定拦截规则:

1
2
3
4
5
6
7
8
9
10
11
12
13
14
15
@Configuration
public class AdminWebConfig implements WebMvcConfigurer {

@Override
public void addInterceptors(InterceptorRegistry registry) {
/*
addPathPatterns("/**");拦截所有请求
excludePathPatterns("/","/login")放行指定请求
静态资源也被拦截
*/
registry.addInterceptor(new LoginInterceptor())
.addPathPatterns("/**") //所有请求都被拦截,包括静态资源
.excludePathPatterns("/","/login","/css/**","/js/**","/images/**","/fonts/**");
}
}

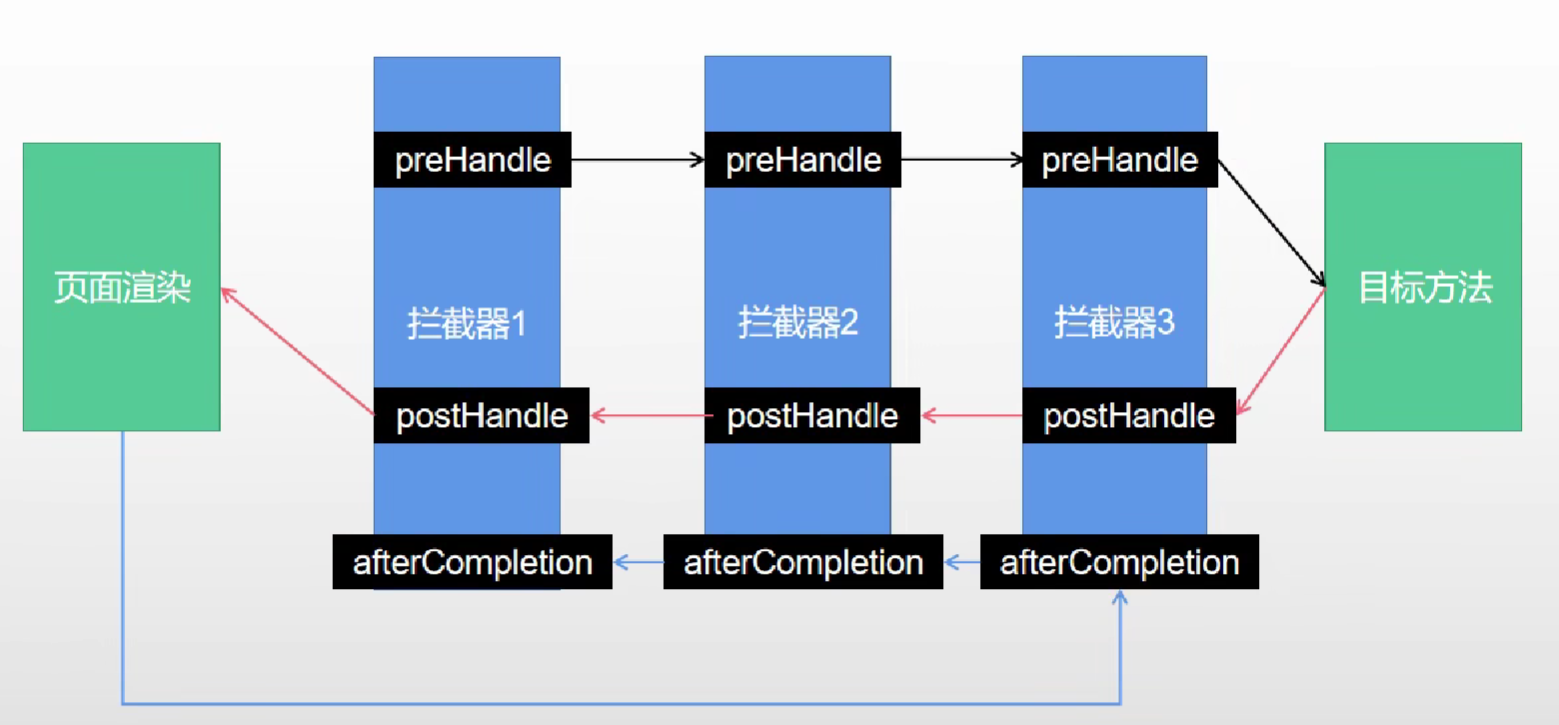
拦截器执行机制

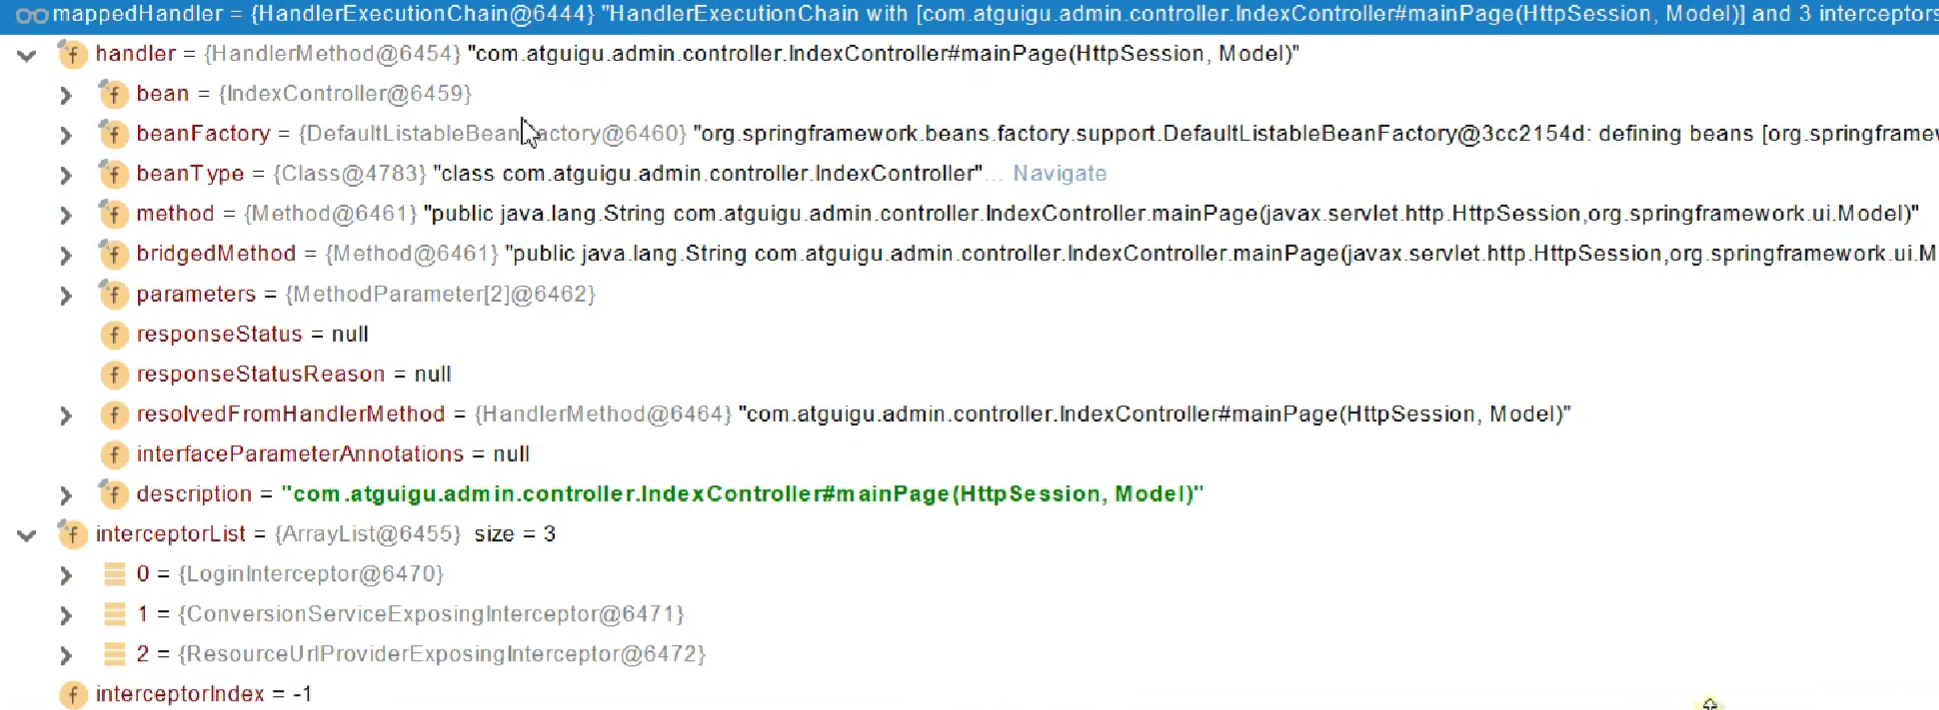
  1. 根据当前请求,找到HandlerExecutionChin【可以处理请求的handler的所有拦截器】
  2. 按照先来顺序执行所有拦截器的 preHandle方法。
    1. 如果当前拦截器返回true。则执行下一个拦截器
    2. 如果返回false。直接触发倒序执行所有已经执行了的拦截器的afterCompletion
  3. 如果任何一个拦截器执行失败。直接跳出,不执行目标方法。
  4. 所有拦截器返回ture,则执行目标方法
  5. 倒序执行所有拦截器的postHandle
  6. 前面步骤有任何异常都会直接触发拦截器的afterCompletion
  7. 页面渲染完成后也会倒序触发afterCompletion
1
2
3
4
doDispatch
if (!mappedHandler.applyPreHandle(processedRequest, response)) {
return;
}

image-20230810223309959

image-20230810224912609

文件上传和下载

使用案例:

1
2
3
4
5
6
7
8
9
10
11
<form th:action="@{/upload}" method="post" enctype="multipart/form-data">
<div>
用户名:<input type="text" name="userName"/><br/>
年龄:<input type="text" name="age"><br/>
<!--单文件上传-->
单文件:<input type="file" name="multipartFile"><br/>
<!--多文件上传-->
多文件:<input type="file" name="multipartFiles" multiple>
</div>
<button type="submit">提交</button>
</form>
1
2
3
4
5
6
7
8
9
10
11
12
13
14
15
16
17
18
19
20
21
22
23
24
25
26
27
28
29
30
31
32
33
34
35
@Slf4j
@Controller
public class FormatUpload {


@PostMapping("/upload")
public String upload(@RequestParam("userName") String userName,
@RequestParam("age") String age,
@RequestPart("multipartFile") MultipartFile multipartFile,
@RequestPart("multipartFiles")MultipartFile[] multipartFiles) throws IOException {


log.info("multipartFiles:{}",multipartFiles.length);

//isEmpty();判断文件是否为空
if(!multipartFile.isEmpty()){
//拿到文件名
String originalFilename = multipartFile.getOriginalFilename();
//保存到本地磁盘
multipartFile.transferTo(new File("D://"+originalFilename));
}

//上传的文件长度大于0
if(multipartFiles.length > 0){
for (MultipartFile file : multipartFiles) {
log.info("fileName{}",file.getOriginalFilename());
if(!file.isEmpty()){
String originalFilenames = file.getOriginalFilename();
file.transferTo(new File("D://"+originalFilenames));
}
}
}
return "main";
}
}
1
2
3
4
# 单次文件上传的大小不能超过
spring.servlet.multipart.max-file-size=1GB
# 总大小不能超过
spring.servlet.multipart.max-request-size=1GB

文件上传参数解析器

文件上传自动配置类:MultipartAutoConfiguration - MultipartProperties

  1. 自动配置好了StandardServletMultipartResolver[文件上传解析器]

  2. 原理步骤

    1. 请求进来使用文件上传解析器判断(isMultipart)并封装文件上传请求。返回文件上传请求HttpServletRequest
    2. 参数解析器解析请求中文件内容封装成MutipartFile

    image-20230811212108638

    1. 将request中的文件信息封装成一个Map

文件下载

1
2
3
4
5
6
7
8
9
10
11
12
13
@GetMapping("/download")
public void download(HttpServletResponse resp) throws IOException {
FileInputStream fis = new FileInputStream(new File("D:\\笔记\\后端路线笔记\\雷神-SpringBoot.md"));
resp.setContentType("application/force-download");
resp.setHeader("Content-Disposition","attachment;fileName="+"SpringBoot.md");
ServletOutputStream os = resp.getOutputStream();
byte[] buf = new byte[1024];
int len = 0;
while ((len = fis.read(buf)) != -1){
os.write(buf,0,len);
}
fis.close();
}

数据访问

SQL

不导入驱动是因为,官方不知道我们接下来操作什么数据库

数据源的自动配置:

  • 导入jdbc的场景

    1
    2
    3
    4
    5
    6
    7
    8
    9
    10
    11
    12
    <dependency>
    <groupId>org.springframework.boot</groupId>
    <artifactId>spring-boot-starter-data-jdbc</artifactId>
    </dependency>

    <!--数据源-->
    <dependency>
    <groupId>com.zaxxer</groupId>
    <artifactId>HikariCP</artifactId>
    <version>4.0.3</version>
    <scope>compile</scope>
    </dependency>
  • 分析自动配置

    DataSourceAutoConfiguration:数据源的自动配置

    • 因为DataSourceAutoConfiguration与DataSourceProperties进行绑定,修改数据源相关的配置,只需要在配置文件中修改spring.datasource即可
    • 数据库连接池的配置,是自己自己容器中没有DataSource才配置的
    • 底层配置好的连接池是:HikariDataSource

    DataSourceTransactionManagerAutoConfiguration:事务管理器的自动配置

    JdbcTemplateAutoConfiguration:JdbcTemplate的自动配置,可以对数据库进行crud操作

    • 可以修改**@ConfigurationProperties(prefix = “spring.jdbc”)**来修改jdbcTemplate
    • @Bean @Primary JdbcTemplate,容器中有这个组件,要使用,直接注入即可

    XADataSourceAutoConfiguration:分布式事务相关的

  • 修改配置项

    1
    2
    3
    4
    5
    6
    7
    8
    9
    10
    11
    spring:
    datasource:
    url: jdbc:mysql://localhost:3306/dd
    username: root
    password: admin
    driver-class-name: com.mysql.cj.jdbc.Driver
    # type: com.zaxxer.hikari.HikariDataSource
    jdbc:
    template:
    # 查询超时时间,如果3秒没查到,认为查询超时
    query-timeout: 3
  • 测试

    1
    2
    3
    4
    5
    @Test
    void contextLoads() {
    Integer integer = jdbcTemplate.queryForObject("select count(*) from login", Integer.class);
    System.out.println(integer);
    }

数据源的配置

Spring Boot整合第三方技术的两种方式:

  • 自定义
  • 找starter场景

自定义方式

  • 添加依赖

    1
    2
    3
    4
    5
    <dependency>
    <groupId>com.alibaba</groupId>
    <artifactId>druid</artifactId>
    <version>1.1.17</version>
    </dependency>
  • 配置Druid数据源

    1
    2
    3
    4
    5
    6
    7
    8
    9
    10
    11
    12
    13
    14
    15
    16
    @Configuration
    public class MyConfig {

    @Bean
    @ConfigurationProperties("spring.datasource")//复用配置文件的数据源配置
    public DataSource dataSource() throws SQLException {
    DruidDataSource druidDataSource = new DruidDataSource();

    //属性抽取成配置文件
    //druidDataSource.setUrl();
    //druidDataSource.setUsername();
    //druidDataSource.setPassword();

    return druidDataSource;
    }
    }
  • 数据源的属性配置

    1
    2
    3
    4
    5
    6
    7
    8
    9
    10
    11
    12
    13
    14
    spring:
    # 这是数据源的配置
    datasource:
    url: jdbc:mysql://localhost:3306/dd
    username: root
    password: admin
    driver-class-name: com.mysql.cj.jdbc.Driver
    # type: com.zaxxer.hikari.HikariDataSource
    # 这是jdbcTemplate的配置
    jdbc:
    template:
    # 查询超时时间,如果3秒没查到,认为查询超时
    query-timeout: 3

  • 更多配置项

    1
    2
    3
    4
    5
    6
    7
    8
    9
    10
    11
    12
    13
    14
    15
    16
    17
    18
    19
    20
    21
    22
    23
    24
    <bean id="dataSource" class="com.alibaba.druid.pool.DruidDataSource" init-method="init" destroy-method="close"> 
    <property name="url" value="${jdbc_url}" />
    <property name="username" value="${jdbc_user}" />
    <property name="password" value="${jdbc_password}" />

    <property name="filters" value="stat" />

    <property name="maxActive" value="20" />
    <property name="initialSize" value="1" />
    <property name="maxWait" value="6000" />
    <property name="minIdle" value="1" />

    <property name="timeBetweenEvictionRunsMillis" value="60000" />
    <property name="minEvictableIdleTimeMillis" value="300000" />

    <property name="testWhileIdle" value="true" />
    <property name="testOnBorrow" value="false" />
    <property name="testOnReturn" value="false" />

    <property name="poolPreparedStatements" value="true" />
    <property name="maxOpenPreparedStatements" value="20" />

    <property name="asyncInit" value="true" />
    </bean>
  • 配置druid的监控页功能

    Druid内置提供了一个StatViewServlet用于展示Druid的统计信息。官方文档 - 配置_StatViewServlet配置。这个StatViewServlet的用途包括:

    • 提供监控信息展示的html页面
    • 提供监控信息的JSON API

    Druid内置提供一个StatFilter用于统计监控信息。官方文档 - 配置_StatFilter

    WebStatFilter用于采集web-jdbc关联监控的数据,如SQL监控、URI监控

    Druid提供了WallFilter,它是基于SQL语义分析来实现防御SQL注入攻击的

    1
    2
    3
    4
    5
    6
    7
    8
    9
    10
    11
    12
    13
    14
    15
    16
    17
    18
    19
    20
    21
    22
    23
    24
    25
    26
    27
    28
    29
    30
    31
    32
    33
    34
    35
    36
    37
    38
    39
    40
    41
    42
    43
    44
    45
    46
    47
    @Configuration
    public class MyDataSource {

    @ConfigurationProperties("spring.datasource")
    @Bean
    public DataSource dataSource() throws SQLException {
    DruidDataSource dataSource = new DruidDataSource();
    // 开启URI监控功能(stat),wall开启防火墙功能
    dataSource.setFilters("stat,wall");
    //属性抽取成配置文件
    return dataSource;
    }

    /**
    * 配置druid的监控页
    * @return
    */
    @Bean
    public ServletRegistrationBean statViewServlet(){
    StatViewServlet statViewServlet = new StatViewServlet();
    ServletRegistrationBean<StatViewServlet> registrationBean =
    new ServletRegistrationBean<>(statViewServlet, "/druid/*");
    //设置监控页的账号密码
    Map<String,String > map = new HashMap<String,String >();
    map.put("loginUsername","admin");
    map.put("loginPassword","123456");
    registrationBean.setInitParameters(map);
    return registrationBean;
    }

    /**
    * 开启web监控
    * @return
    */
    @Bean
    public FilterRegistrationBean webStatFilter(){
    WebStatFilter statFilter = new WebStatFilter();
    FilterRegistrationBean<WebStatFilter> registrationBean =
    new FilterRegistrationBean<WebStatFilter>(statFilter);
    registrationBean.setUrlPatterns(Arrays.asList("/*"));
    registrationBean.addInitParameter(
    "exclusions","*.js,*.gif,*.jgp,*.png,*.css,*.ico,/druid/*");
    return registrationBean;
    }

    }

数据源整合stater的配置

  • 引入druid-starter

    1
    2
    3
    4
    5
    <dependency>
    <groupId>com.alibaba</groupId>
    <artifactId>druid-spring-boot-starter</artifactId>
    <version>1.2.6</version>
    </dependency>
  • 分析自动配置

    • @EnableConfigurationProperties({DruidStatProperties.class, DataSourceProperties.class})

    • 扩展配置项:spring.datasource.druid

    • DruidSpringAopConfiguration.class, 监控SpringBean的;配置项:spring.datasource.druid.aop-patterns

    • DruidStatViewServletConfiguration.class,监控页的配置。spring.datasource.druid.stat-view-servlet默认开启。

    • DruidWebStatFilterConfiguration.class, web监控配置。spring.datasource.druid.web-stat-filter默认开启。

    • DruidFilterConfiguration.class, 所有Druid的filter的配置:

      1
      2
      3
      4
      5
      6
      7
      8
      private static final String FILTER_STAT_PREFIX = "spring.datasource.druid.filter.stat";
      private static final String FILTER_CONFIG_PREFIX = "spring.datasource.druid.filter.config";
      private static final String FILTER_ENCODING_PREFIX = "spring.datasource.druid.filter.encoding";
      private static final String FILTER_SLF4J_PREFIX = "spring.datasource.druid.filter.slf4j";
      private static final String FILTER_LOG4J_PREFIX = "spring.datasource.druid.filter.log4j";
      private static final String FILTER_LOG4J2_PREFIX = "spring.datasource.druid.filter.log4j2";
      private static final String FILTER_COMMONS_LOG_PREFIX = "spring.datasource.druid.filter.commons-log";
      private static final String FILTER_WALL_PREFIX = "spring.datasource.druid.filter.wall";

    配置示例

    1
    2
    3
    4
    5
    6
    7
    8
    9
    10
    11
    12
    13
    14
    15
    16
    17
    18
    19
    20
    21
    22
    23
    24
    25
    26
    27
    28
    29
    30
    31
    32
    33
    34
    35
    36
    37
    38
    39
    spring:
    # 数据源的配置
    datasource:
    url: jdbc:mysql://localhost:3306/dd
    username: root
    password: admin
    driver-class-name: com.mysql.cj.jdbc.Driver
    # type: com.zaxxer.hikari.HikariDataSource

    druid:
    # 这个包下的所有东西都进行监控,监控spring
    aop-patterns: com.thymeleaf.springbootthymeleaf.*
    # 开启sql监控功能(stat),开启监控防火墙功能(wall)
    filters: stat,wall

    #开启了监控页功能
    stat-view-servlet:
    enabled: true
    # 监控页的登录配置
    login-username: admin
    login-password: 123456
    reset-enable: false # 将重置按钮禁用

    # web监控功能
    web-stat-filter:
    enabled: true
    url-pattern: /* # 匹配的哪些
    exclusions: '*.js,*.gif,*.jpg,*.png,*.css,*.ico,/druid/*' # 排除哪些

    #配置单个的
    filter:
    stat:
    slow-sql-millis: 1000 # 慢查询的世界,单位毫秒,
    enabled: true
    log-slow-sql: true
    wall:
    enabled: true
    config:
    drop-table-allow: false #禁用掉所有删表操

整合Mybatis操作

官方文档

starter的命名方式

  1. SpringBoot官方的Starter:spring-boot-starter-*
  2. 第三方的: *-spring-boot-starter

引入依赖

1
2
3
4
5
<dependency>
<groupId>org.mybatis.spring.boot</groupId>
<artifactId>mybatis-spring-boot-starter</artifactId>
<version>2.1.4</version>
</dependency>

配置模式:

  • SqlSessionFactory:自动配置好了
  • SqlSession:自动配置了SqlSessionTemplate 组合了SqlSession
  • @Import(AutoConfiguredMapperScannerRegistrar.class)
  • Mapper: 只要我们写的操作MyBatis的接口标准了**@Mapper**就会被自动扫描进来

使用案例:

mapper接口:

1
2
3
4
5
@Mapper
public interface UserMapper {

User getUser(Long id);
}

对应的映射文件:

1
2
3
4
5
<mapper namespace="com.thymeleaf.springbootthymeleaf.mapper.UserMapper">
<select id="getUser" resultType="com.thymeleaf.springbootthymeleaf.bean.User">
select * from user where id = #{id}
</select>
</mapper>

service:

1
2
3
4
5
6
7
8
9
10
11
@Service
public class UserService {

@Autowired
private UserMapper userMapper;

public User user(Long id){
return userMapper.getUser(id);
}

}

Controller:

1
2
3
4
5
6
7
8
9
10
11
12
@Controller
public class IndexController {

@Autowired
private UserService userService;

@GetMapping("/user")
@ResponseBody
public User user(@RequestParam("id")Long id){
return userService.user(id);
}
}

yaml:

1
2
3
4
5
6
7
8
9
10
11
12
13
14
15
16
17
spring:
# 数据源的配置
datasource:
url: jdbc:mysql://localhost:3306/dd
username: root
password: admin
driver-class-name: com.mysql.cj.jdbc.Driver
# type: com.zaxxer.hikari.HikariDataSource

# mybatis的配置
mybatis:
# mybatis 全局配置文件的位置
mapper-locations: classpath:mybatis/mapper/*.xml
# config-location: classpath:mybatis/mybatis-config.xml
configuration:
# 驼峰命名规则,可以不用指定全局配置文件的位置
map-underscore-to-camel-case: true
  • 简单DAO方法就写在注解上。复杂的就写在配置文件里。
  • 使用@MapperScan("com.lun.boot.mapper") 简化,Mapper接口就可以不用标注@Mapper注解。
1
2
3
4
5
6
7
8
9
@MapperScan("com.thymeleaf.springbootthymeleaf.mapper")
@SpringBootApplication
public class SpringbootThymeleafApplication {

public static void main(String[] args) {
SpringApplication.run(SpringbootThymeleafApplication.class, args);
}

}

最佳实战:

  • 简单方法使用注解
  • 复杂方式使用接口绑定映射

Mybatis-Plus整合

你可以通过Spring Initializr添加MyBatis的Starer。

Mybatis-Plus官网

Mybatis-Plus官方文档

Mybatis-Plus是什么?

MyBatis-Plus(简称 MP)是一个 MyBatis的增强工具,在 MyBatis 的基础上只做增强不做改变,为简化开发、提高效率而生。

  • **MybatisPlusAutoConfiguration配置类,MybatisPlusProperties**配置项绑定。
  • **SqlSessionFactory**自动配置好,底层是容器中默认的数据源。
  • mapperLocations自动配置好的,有默认值classpath*:/mapper/**/*.xml,这表示任意包的类路径下的所有mapper文件夹下任意路径下的所有xml都是sql映射文件。 建议以后sql映射文件放在 mapper下。
  • 容器中也自动配置好了SqlSessionTemplate。
  • @Mapper 标注的接口也会被自动扫描,建议直接 **@MapperScan(“com.lun.boot.mapper”)**批量扫描。
  • MyBatisPlus优点之一:只需要我们的Mapper继承MyBatisPlus的BaseMapper 就可以拥有CRUD能力,减轻开发工作。

Generator

1
2
3
4
5
6
7
8
9
10
11
12
<!-- https://mvnrepository.com/artifact/com.baomidou/mybatis-plus-generator -->
<dependency>
<groupId>com.baomidou</groupId>
<artifactId>mybatis-plus-generator</artifactId>
<version>3.5.1</version>
</dependency>
<!-- https://mvnrepository.com/artifact/org.freemarker/freemarker -->
<dependency>
<groupId>org.apache.velocity</groupId>
<artifactId>velocity-engine-core</artifactId>
<version>2.2</version>
</dependency>
1
2
3
4
5
6
7
8
9
10
11
12
13
14
15
16
17
18
19
20
21
22
23
24
25
26
27
28
29
30
31
32
33
34
35
36
37
38
39
40
41
42
43
44
45
46
47
48
49
50
51
52
53
54
55
56
57
58
59
60
61
62
63
64
65
66
67
68
69
70
71
72
73
74
75
76
77
78
79
80
81
82
83
84
85
86
87
88
89
90
91
92
package com.xinke.springboot.utils;

import com.baomidou.mybatisplus.annotation.FieldFill;
import com.baomidou.mybatisplus.core.mapper.BaseMapper;
import com.baomidou.mybatisplus.generator.FastAutoGenerator;
import com.baomidou.mybatisplus.generator.config.OutputFile;
import com.baomidou.mybatisplus.generator.config.rules.DateType;
import com.baomidou.mybatisplus.generator.config.rules.NamingStrategy;
import com.baomidou.mybatisplus.generator.engine.VelocityTemplateEngine;
import com.baomidou.mybatisplus.generator.fill.Property;

import java.util.ArrayList;
import java.util.Collections;
import java.util.Scanner;

public class GeneratorUtil {


private static final String URL = "jdbc:mysql://localhost:3306/xky?characterEncoding=utf-8&useSSL=false&serverTimezone=UTC";
private static final String USER = "root";
private static final String PASS = "root";

// 作者
private static final String AUTHOR = "chenjz";

// 设置需要生成的表名
private static String[] TABLE = {};

// 设置mapperXML生成的路径
private static final String XML_PATH = "/src/main/resources/com/xk/springboot/mapper";


public static void main(String[] args) {
Scanner sc = new Scanner(System.in);
System.out.println("请输入表名用逗号分隔:");
String table = sc.next();
TABLE = table.split(",");
//获取当前项目路径
String property = System.getProperty("user.dir");
FastAutoGenerator.create(URL, USER, PASS)
//全局配置
.globalConfig(builder -> {
builder.author(AUTHOR) // 设置作者
.enableSwagger() // 开启 swagger 模式
.dateType(DateType.ONLY_DATE) //设置事件策略
.commentDate("yyyy-MM-dd") // 注释日期
.disableOpenDir() //生成完成后不打开文件夹
.outputDir(property + "/src/main/java") // 指定输出目录
.fileOverride(); // 重新生成覆盖原有文件

})
//包配置
.packageConfig(builder -> {
builder.parent("com.xinke.springboot") // 设置父包名
.moduleName("") // 设置父包模块名
.entity("entity")
.service("service")
.serviceImpl("service.impl")
.controller("controller")
.mapper("mapper")
.xml("xml")
.pathInfo(Collections.singletonMap(OutputFile.mapperXml, property + XML_PATH)); // 设置mapperXml生成路径
})
//
.strategyConfig(builder -> {
builder.addInclude(TABLE) // 设置需要生成的表名
// .addFieldPrefix("")//指定表的哪些字段去掉
.serviceBuilder()//开始设置服务层
.formatServiceFileName("%sService")//设置server的类名 user ->userServer
.formatServiceImplFileName("%sServiceImpl")// user ->userServerImpl
.entityBuilder()
// .enableColumnConstant()//生成字段常量
.naming(NamingStrategy.underline_to_camel)//生成符合驼峰命名
.enableChainModel()//支持链式书写
.enableLombok()//支持lombok
.addTableFills(new Property("creat_time", FieldFill.INSERT))
.addTableFills(new Property("update_time", FieldFill.INSERT_UPDATE))
.logicDeletePropertyName("deleted")//指出逻辑删除
.enableTableFieldAnnotation()//提供字段注解
.controllerBuilder()
.formatFileName("%sController")
.enableRestStyle()//生成@restcontroller 风格
.mapperBuilder()
.superClass(BaseMapper.class)//继承
.formatMapperFileName("%sDao")
.formatXmlFileName("%sMapper");
})
// 使用Freemarker引擎模板,默认的是Velocity引擎模板
.templateEngine(new VelocityTemplateEngine())
.execute();
}
}

NoSQL

Reids的自动配置

1
2
3
4
<dependency>
<groupId>org.springframework.boot</groupId>
<artifactId>spring-boot-starter-data-redis</artifactId>
</dependency>

自动配置:

  1. RedisAutoConfiguration 自动配置类。
  2. 连接工厂是准备好的。LettuceConnectionConfiguration,JedisConnectionConfiguration
  3. 自动注入了RedisTemplate<Object, Object>
  4. 自动注入了StringRedisTemplate。key,value都是String
  5. key和vue都运行是Object
  6. 底层只要我们使用StringRedisTemplate,RedisTemplate就可以操作Redis
1
2
3
spring:
redis:
template: redis://账号:密码@地址:端口号

切换jedis

1
2
3
4
<dependency>
<groupId>redis.clients</groupId>
<artifactId>jedis</artifactId>
</dependency>
1
2
3
4
spring:
redis:
template: redis://账号:密码@地址:端口号
client-type: jedis

单元测试

Junit5

JUnit Platform:Junit Platform是在JVM上启动测试框架的基础,不仅支持Junit自制的测试引擎,其他测试引擎也都可以接入。
JUnit Jupiter:JUnit Jupiter提供了J儿Unit5的新的编程模型,是儿nit5新特性的核心。内部包含了一个测试引擎,用于在Junit Platform上运行。
JUnit Vintage:由于JUint已经发展多年,为了照顾老的项目,JUnit Vintage提供了兼容JUnit4,xJunit3.x的测试引擎。
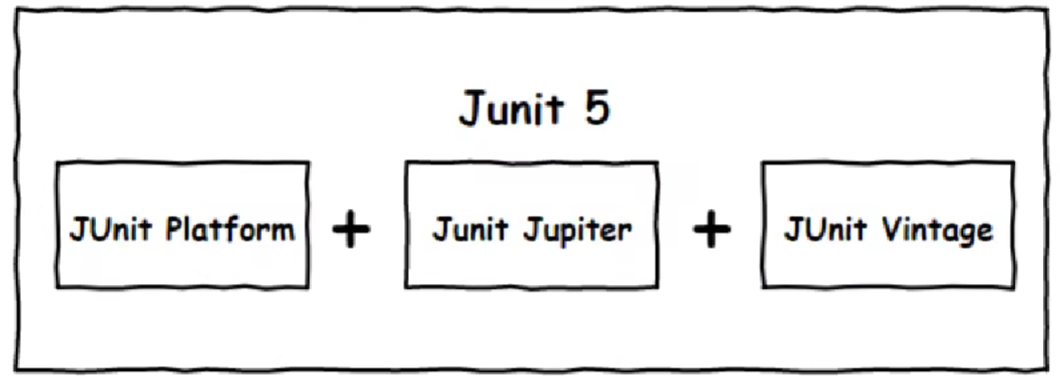
image-20230812224409684

SpringBoot 2.4以上版本移除了默认对Vintage的依赖。如果需要兼容junit4需要自行引入〔不能使用junit4的功能Test)

如果要兼容junit4需要自行引入bintage引擎。

1
2
3
4
5
6
7
8
9
10
11
12
13
14
15
16
<!--junit5-->
<dependency>
<groupId>org.springframework.boot</groupId>
<artifactId>spring-boot-starter-test</artifactId>
</dependency>
<!--兼容junit4-->
<dependency>
<groupId>org.junit.vintage</groupId>
<artifactId>junit-vintage-engine</artifactId>
<scope>test</scope>
<exclusions>
<exclusion>
<groupId>org.hamcrest</groupId>
<artifactId>hamcrest-core</artifactId></exclusion>
</exclusions>
</dependency>

Springboot整合Junit以后

  • 编写测试方法:@Test标注
  • Junit具有Spring的功能。比如使用@Transactional注解标注测试方法,测试完后会自动回滚。

常用注解

  1. @Test:表示方法是测试方法。但是与Junit4的@Test不同。他的职责非常单一不能声明任何属性,拓展的测试将会由Jupiter提供额外测试
  2. @ParameterizedTest:表示方法是参数化测试,下方会有详细介绍
  3. @RepeatedTest:表示方法可重复执行,下方会有详细介绍
  4. @DisplayName:为测试类或者测试方法设置展示名称
  5. @BeforeEach:表示在每个单元测试之前执行
  6. @AfterEach:表示在每个单元测试之后执行
  7. @BeforeAll:表示在所有单元测试之前执行
  8. @AfterAll:表示在所有单元测试之后执行
  9. @Tag:表示单元测试类别,类似于JUnit4中的@Categories
  10. @Disabled:表示测试类或测试方法不执行,类似于JUnit4中的@Ignore
  11. @lgnore@Timeout:表示测试方法运行如果超过了指定时间将会返回错误
  12. @ExtendWith:为测试类或测试方法提供扩展类引用
1
2
3
4
5
6
7
8
9
10
11
12
13
14
15
16
17
18
19
20
21
22
23
24
25
26
27
28
29
30
31
32
33
34
35
36
@DisplayName("测试Junit5Test")
@SpringBootTest // 如果需要springboot的注入功能需要加速该注解
public class Junit5Test {

@DisplayName("测试DisplayName注解")
@Test
void testDisplayName(){
System.out.println(1);
}

@DisplayName("测试方法2")
@Test
void testTwo(){
System.out.println(2);
}

@BeforeEach
void testBeforeEach(){
System.out.println("BeforeEach");
}

@AfterEach
void testAfterEach(){
System.out.println("AfterEach");
}

@BeforeAll
static void testBeforeAll(){
System.out.println("所有方法测试要开始了");
}

@AfterAll
static void testAfterAll(){
System.out.println("所有方法测试要结束了");
}
}

参数化测试

利用@ValueSource等注解,指定入参,我们将可以使用不同的参数进行多次单元测试,而不需要每新增—个参数就新增一个单元测试,省去了很多冗余代码。

  1. @ValueSource:为参数化测试指定入参来源,支持八大基础类以及String类型,Class类型
  2. @NullSource:表示为参数化测试提供一个null的入参
  3. @EnumSource:表示为参数化测试提供一个枚举入参
  4. @CsvFileSource:表示读取指定CSV文件内容作为参数化测试入参
  5. @MethodSource:表示读取指定方法的返回值作为参数化测试入参(注意方法返回需要是一个流)
1
2
3
4
5
6
7
8
9
10
11
12
13
14
15
@ParameterizedTest
@ValueSource(ints = {1,2,3,4,5})
void testParameterizedTest(int i){
System.out.println(i);
}

@ParameterizedTest
@MethodSource("stringStream")
void testParameterizedTest(String str){
System.out.println(str);
}

static Stream<String> stringStream(){
return Stream.of("tom","banner");
}

指标监控

SpringBoot Actuator

未来每一个微服务在云上部署以后,我们都需要对其进行监控追踪、审计、控制等。Springboot就抽取了Actuator场景,使得我们每个微服务快速引用即可获得生产级别的应用监控、审计等功能。

1
2
3
4
<dependency>
<groupId>org.springframework.boot</groupId>
<artifactId>spring-boot-starter-actuator</artifactId>
</dependency>

使用

1
2
3
4
5
6
management:
endpoints:
enabled-by-default: true
web:
exposure:
include: '*'

测试:

http://localhost:8080/actuator/beans

最常用的:

  1. Health:健康状况
  2. Metrics:运行时指标
  3. Loggers:日志记录

定制Health信息

1
2
3
4
5
management:
endpoint:
health:
enabled: true
show-details: always
1
2
3
4
5
6
7
8
9
10
11
12
13
14
15
16
17
18
19
20
21
@Component
public class MyHealthIndicator extends AbstractHealthIndicator {

/**
* 检查是否健康
*/
@Override
protected void doHealthCheck(Health.Builder builder) throws Exception {
HashMap<String, Object> map = new HashMap<>();
// 检查
if(1==2){
builder.up(); // 健康
map.put("count",1);
}else {
builder.status(Status.DOWN);// 宕机
map.put("count",2);
}

builder.withDetail("code",100).withDetails(map);
}
}

定制metrics

1
2
3
4
5
6
7
8
9
10
11
12
13
14
class MyService{
Counter counter;
public MyService(MeterRegistry meterRegistry){
counter = meterRegistry.counter( "myservice.method.running.counter" );
}
public void hello(){
counter.increment();
}
}
//也可以使用下面的方式
@Bean
MeterBinder queueSize(Queue queue) {
return (registry) -> Gauge.builder("queueSize",queue::size).register(registry);
}

定制Endpoint

image-20230813193733259

Profile功能

为了方便多环境适配,springboot简化了profile功能。

  • 默认配置文件application.yaml;任何时候都会加载
  • 指定环境配置文件application-{env}.yaml
  • 激活指定环境
    • 配置文件激活
    • 命令行激活
  • 默认配置与环境配置同时生效
  • 同名配置项,profile配置优先
1
2
3
4
5
6
7
8
9
10
11
@RestController
public class HelloController {

@Value("${person.name}")
private String name;

@GetMapping("/hello")
public String hell(){
return "hello " + name;
}
}

根据环境的不同会取不同的值

1
2
3
4
5
6
7
8
9
10
11
12
13
14
application.yaml
person.name: 张三
server:
port: 8000

spring:
profiles:
active: prod

application-prod.yaml
person.name: 李四

application-test.yaml
person.name: 王五

还有一种打成jar包,以某一个环境运行jar包

1
java -jar jar包 --spring.profiles.active=test

@Profile

1
2
3
4
5
6
7
8
9
10
11
12
13
14
15
@Configuration
public class MyConfig {

@Profile("prod")
@Bean
public void bean1(){
System.out.println("111");
}

@Profile("test")
@Bean
public void bean2(){
System.out.println("222");
}
}

自定义Starter

https://www.bilibili.com/video/BV19K4y1L7MT?p=83&vd_source=56837d02f74d5690be7060165a14c9b6

Starter启动原理
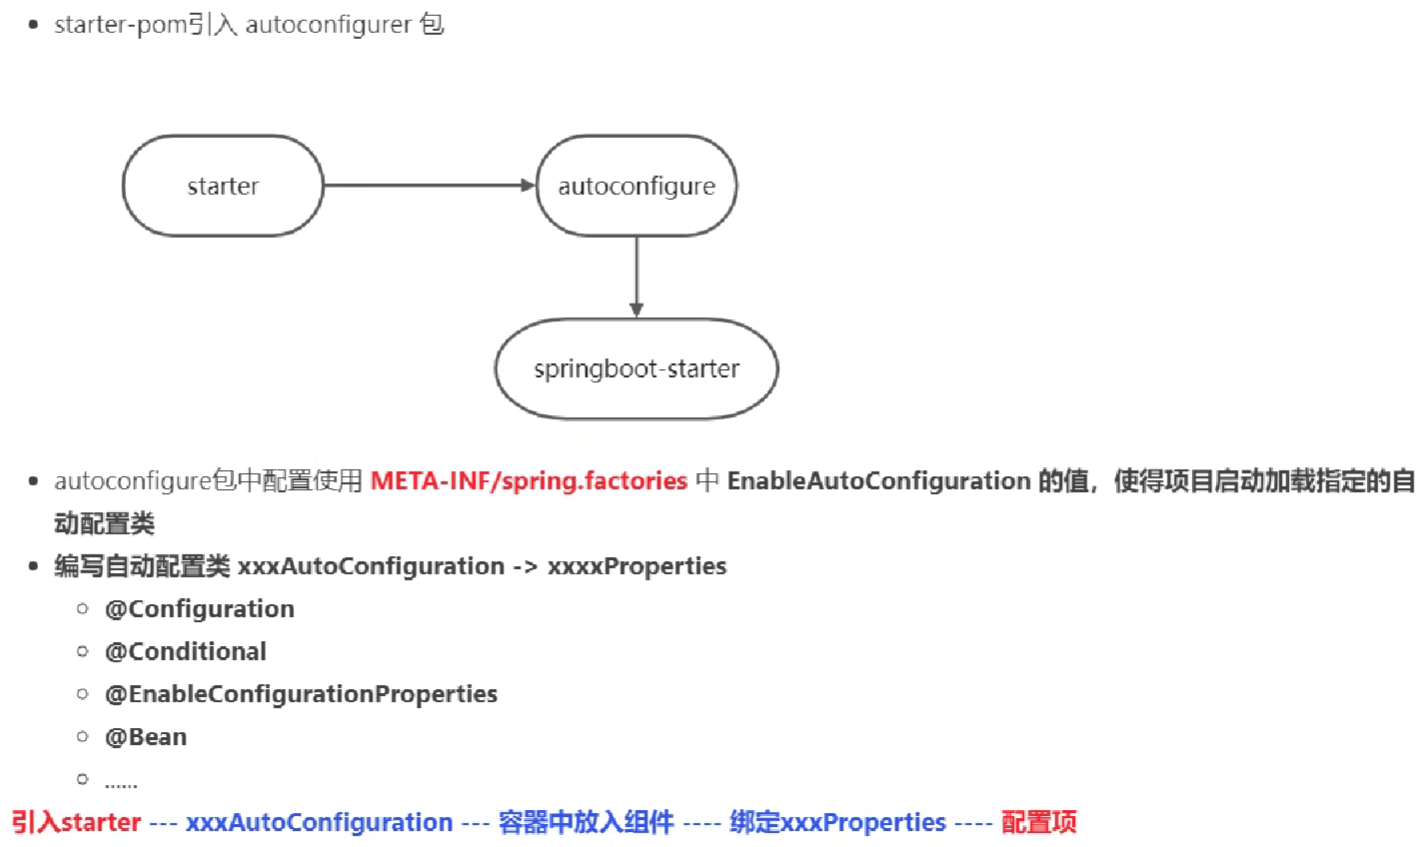
image-20230813214840799

远程调用

Spring给我们提供了一个RestTemplate的API,可以方便的实现Http请求的发送。

  1. 注入Bean
1
2
3
4
5
6
7
8
@Configuration
public class RemoteCallConfig {

@Bean
public RestTemplate restTemplate() {
return new RestTemplate();
}
}
  1. 使用
1
2
3
4
5
6
7
8
9
10
11
12
13
14
15
16
17
18
19
20
21
Set<Long> itemIds = vos.stream().map(CartVO::getItemId).collect(Collectors.toSet());
// 2.查询商品
// List<ItemDTO> items = itemService.queryItemByIds(itemIds);
// 2.1.利用RestTemplate发起http请求,得到http的响应
ResponseEntity<List<ItemDTO>> response = restTemplate.exchange(
"http://localhost:8081/items?ids={ids}",
HttpMethod.GET,
null,
new ParameterizedTypeReference<List<ItemDTO>>() {
},
Map.of("ids", CollUtil.join(itemIds, ","))
);
// 2.2.解析响应
if(!response.getStatusCode().is2xxSuccessful()){
// 查询失败,直接结束
return;
}
List<ItemDTO> items = response.getBody();
if (CollUtils.isEmpty(items)) {
return;
}